2018
Benefits of Golang
01/08/18 22:27 Filed in: Programming | Golang
Go is an open source programming language that makes it easy to build simple, reliable, efficient software and provides a robust development experience and avoids many issues that existing programming languages have. The strengths of Go are that it
Easy to learn
Go is so small and simple that the entire language and its underlying concepts can be studied in just a couple of days
Built-in concurrency
Go was written in the age of multi-core CPUs and has easy, high-level CSP-style concurrency built into the language compared the other languages Java, JavaScript, Python, Ruby, C, C++ have been designed in the 1980s-2000s when most CPUs had only one compute core.
Uses OO — the good parts
Go takes a fresh approach at object-orientation with those learnings in mind. It keeps the good parts like encapsulation and message passing. Go avoids inheritance because it is now considered harmful and provides first-class support for composition instead.
Modern standard library
Languages including Java, JavaScript, Python, Ruby were designed before the internet was the ubiquitous computing platform it is today. Hence, the standard libraries of these languages provide only relatively generic support for networking that isn’t optimized for the modern internet. Go was created a decade ago when the internet was already in full swing. Go’s standard library allows creating even sophisticated network services without third-party libraries.
Extremely fast compiler
Go is designed from the ground up to make compilation efficient and as a result its compiler is so fast that there are almost no compilation delays. This gives a Go developer instant feedback similar to scripting languages, with the added benefits of static type checking.
Easy cross compilation
Go supports compilation to many platforms like macOS, Linux, Windows, BSD, ARM, and more. Go can compile binaries for all these platforms out of the box. This makes deployment from a single machine easy.
Executes very fast
Go runs close to the speed of C. Unlike JITed languages (Java, JavaScript, Python, etc), Go binaries require no startup or warmup time because they ship as compiled and fully optimized native code
Small memory footprint & deployment size
Runtimes like the JVM, Python, or Node don’t just load your program code when running it. They also load large and highly complex pieces of infrastructure to compile and optimize your program each time you run it. This makes their startup time slower and causes them to use large amounts (hundreds of MB) of RAM. Go processes have less overhead because they are already fully compiled and optimized and just need to run
Create private ethereum in Mac environment
21/04/18 09:07 Filed in: Blockchain
Using homebrew is easier to setup. To setup brew in your Mac try this https://brew.sh/
$brew update
$brew upgrade
$brew tap ethereum/ethereum
$brew install ethereum
For this setup I use ~/code/ethereum as my root directory for development setup. Create devethchain directory.
$mkdir devethchain
Create accounts
$geth --datadir ~/code/ethereum/devethchain account new

Create multiple accounts. After creating if you list files in keystore, you should see following files
$ls -l keystore

Get the account ID
In genesis file following values can be filled in
- chainId — chain’s identifier, is used in replay protection.
- homesteadBlock, eip155Block, eip158Block, byzantiumBlock — these relate to chain forking and versioning, for new blockchain leave them as 0 value.
This is to mine a block. Setting this value low (~10–10000) is helpful in a private blockchain as it lets you mine blocks quickly, which equals fast transactions, and plenty of ETH to test with. For comparison, the Ethereum mainnet Genesis file defines a difficulty of 17179869184.
This is the the total amount of gas that can be used in each block. With such a low mining difficulty, blocks will be moving pretty quick, but you should still set this value pretty high to avoid hitting the limit and slowing down your network.
Here you can allocate ETH to specific addresses you have created before. You will need to add the account to your private chain in order to use it, and to do that you need access to the keystore/utc file. The addresses provided are not real addresses, they are just examples. Here we allocate 100,000 and 120,000 ETH respectively.
$cd ~/code/ethereum/devethchain
$touch devgenesis.json
Add following into devgenesis.json file
{
"config": {
"chainId": 1966,
"homesteadBlock": 0,
"eip155Block": 0,
"eip158Block": 0,
"byzantiumBlock": 0
},
"difficulty": "400",
"gasLimit": "2000000",
"alloc": {
"b0f4aa6ba57c075f596af7e56d4c63ca986fc0e5": {
"balance": "100000000000000000000000"
},
"b2be78f4cac00988250aaaa1c7001e199b426c3b": {
"balance": "120000000000000000000000"
}
}
}
geth --datadir ~/code/ethereum/devethchain init ~/code/ethereum/devethchain/devgenesis.json

Start private chain
To keep private network you have to provide Networkid value. You can use any number here, I have used 196609, but other peers joining your network must use the same one.
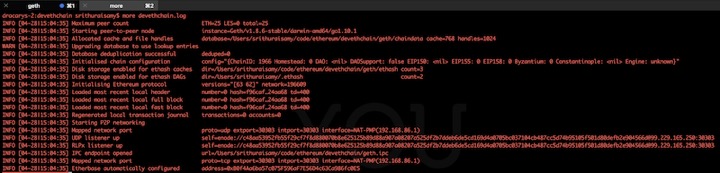
geth --datadir ~/code/ethereum/devethchain --networkid 196609 console 2>> devethchain.log

Output should be like above. This is the geth JavaScript console. Any command with the symbol > should be typed here.
To view logs, open another terminal and tail the log file created after starting the private chain. The log file should be similar to below.
You can create new account in the java script console or import UTC file into keystone directory. I'm going to use one of account as default account created in genesis Gile.
Find default account, type the following command in javascript console.
>eth.coinbase
This will display first account in alloc. Incase if you want to change second one type following in javascript console.
>miner.setEtherbase(web3.eth.accounts[1])
To check the balance
>eth.getBalance(eth.coinbase)
To start the mining
>miner.start()
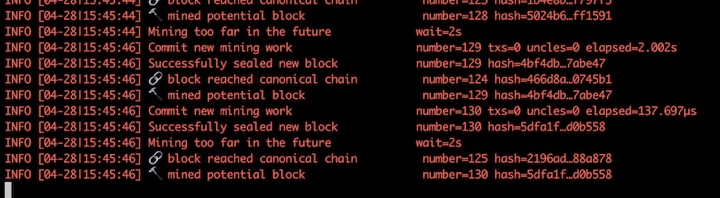
In the other terminal you can see the mining action in the log file as below.
If you want to stop mining
To get node info
>admin.nodeInfo.enode
You may see message similar to below with different address.
"enode://c48aa53952fb55f29cf7f8d880070b8e625125b89d88a907a08207a525df2b7ddeb6de5cd169d4a0705bc037104cb487cc5d74b95105f501d80defb2e904566d@[::]:30303"
This information you may need to add more peers
Install geth
$brew update
$brew upgrade
$brew tap ethereum/ethereum
$brew install ethereum
For this setup I use ~/code/ethereum as my root directory for development setup. Create devethchain directory.
$mkdir devethchain
Create accounts
$geth --datadir ~/code/ethereum/devethchain account new
Create multiple accounts. After creating if you list files in keystore, you should see following files
$ls -l keystore
Get the account ID
Create Genesis file
In genesis file following values can be filled in
config
- chainId — chain’s identifier, is used in replay protection.
- homesteadBlock, eip155Block, eip158Block, byzantiumBlock — these relate to chain forking and versioning, for new blockchain leave them as 0 value.
difficulty
This is to mine a block. Setting this value low (~10–10000) is helpful in a private blockchain as it lets you mine blocks quickly, which equals fast transactions, and plenty of ETH to test with. For comparison, the Ethereum mainnet Genesis file defines a difficulty of 17179869184.
gasLimit
This is the the total amount of gas that can be used in each block. With such a low mining difficulty, blocks will be moving pretty quick, but you should still set this value pretty high to avoid hitting the limit and slowing down your network.
alloc
Here you can allocate ETH to specific addresses you have created before. You will need to add the account to your private chain in order to use it, and to do that you need access to the keystore/utc file. The addresses provided are not real addresses, they are just examples. Here we allocate 100,000 and 120,000 ETH respectively.
$cd ~/code/ethereum/devethchain
$touch devgenesis.json
Add following into devgenesis.json file
{
"config": {
"chainId": 1966,
"homesteadBlock": 0,
"eip155Block": 0,
"eip158Block": 0,
"byzantiumBlock": 0
},
"difficulty": "400",
"gasLimit": "2000000",
"alloc": {
"b0f4aa6ba57c075f596af7e56d4c63ca986fc0e5": {
"balance": "100000000000000000000000"
},
"b2be78f4cac00988250aaaa1c7001e199b426c3b": {
"balance": "120000000000000000000000"
}
}
}
Initialize your node
geth --datadir ~/code/ethereum/devethchain init ~/code/ethereum/devethchain/devgenesis.json
Start private chain
To keep private network you have to provide Networkid value. You can use any number here, I have used 196609, but other peers joining your network must use the same one.
geth --datadir ~/code/ethereum/devethchain --networkid 196609 console 2>> devethchain.log
Output should be like above. This is the geth JavaScript console. Any command with the symbol > should be typed here.
To view logs, open another terminal and tail the log file created after starting the private chain. The log file should be similar to below.
You can create new account in the java script console or import UTC file into keystone directory. I'm going to use one of account as default account created in genesis Gile.
Find default account, type the following command in javascript console.
>eth.coinbase
This will display first account in alloc. Incase if you want to change second one type following in javascript console.
>miner.setEtherbase(web3.eth.accounts[1])
To check the balance
>eth.getBalance(eth.coinbase)
To start the mining
>miner.start()
In the other terminal you can see the mining action in the log file as below.
If you want to stop mining
To get node info
>admin.nodeInfo.enode
You may see message similar to below with different address.
"enode://c48aa53952fb55f29cf7f8d880070b8e625125b89d88a907a08207a525df2b7ddeb6de5cd169d4a0705bc037104cb487cc5d74b95105f501d80defb2e904566d@[::]:30303"
This information you may need to add more peers
Dependency management in Golang
15/04/18 18:14 Filed in: Golang
Glide was one of the top tool for dependency management for Go. The Glide may become obsolete because of Dev packages introduced in Golang.
dep is a prototype dependency management tool for Go. It requires Go 1.9 or newer to compile. dep is safe for production use. Initially there was planning to integrate deployment into go 1.10.x version but still it has long way. So now you have to install and use separately.
Following are the examples for dep command.
dep init set up a new project
dep ensure install the project's dependencies
dep ensure -update update the locked versions of all dependencies
dep ensure -add github.com/pkg/errors add a dependency to the project
- Message from Glide team :
dep is a prototype dependency management tool for Go. It requires Go 1.9 or newer to compile. dep is safe for production use. Initially there was planning to integrate deployment into go 1.10.x version but still it has long way. So now you have to install and use separately.
Install dep package
- $ brew install dep
- $ brew upgrade dep
Create the project inside $GOPATH
- Create new project under $GOPATH/src/elasticcloudapps.com/hellodep
- package main
- import (
- )
- func main() {
- }
- Initialize dep
- Dep needs two files called Gopkg.lock and Gopkg.toml. You can initialize these files with following
- $ dep init
- Locking in master (d644981) for transitive dep golang.org/x/crypto
- Locking in master (2281fa9) for transitive dep golang.org/x/sys
- Using ^1.0.5 as constraint for direct dep github.com/sirupsen/logrus
- Locking in v1.0.5 (c155da1) for direct dep github.com/sirupsen/logrus
- After this the new files will be generated.
Following are the examples for dep command.
dep init set up a new project
dep ensure install the project's dependencies
dep ensure -update update the locked versions of all dependencies
dep ensure -add github.com/pkg/errors add a dependency to the project
Easy way to create ICO on Stellar network
07/04/18 21:54 Filed in: Blockchain
An Initial Coin Offering (ICO) is used by startups to bypass the rigorous and regulated capital-raising process required by venture capitalists or banks. In an ICO campaign, a percentage of the cryptocurrency is sold to early backers of the project in exchange for legal tender or other cryptocurrencies. The majority of the ICOs today are made on Ethereum (ERC20 token). But Ethereum is slow running transaction with high cost. If required to raise funds for the startup then Stellar can do a lot faster, better and cheaper, it is an open source platform for developing financial applications.
The advantages are:
• Less transaction fees
• Perform almost 100 time faster
• Less development effort to get ICO online.
• Tokens are available on Stellar Distributed Exchange in a day, where anyone can trade without waiting for it to get listed on other exchanges.
Stellar is an infrastructure for payments; connects banks, payments systems and people around the world, designed from the start to make it really easy for financial institutions to issue tokens representing fiat currencies. Also has built in distributed exchange which allows people to not only buy and sell currencies like in a typical foreign exchange way but also to seamlessly convert from one currency to another during cross border or cross currency transactions.
In this blog I have described how to create custom token on Stellar Network and accepting BTC/ETH contributions in an ICO. We will be using stellar laboratory and test network for this article. The functionalities provided here can be done through Stellar SDK as well. We need two accounts on Stellar to proceed, one is “Issuing account” and another is “Distributing account”. Although you could create tokens using one account but its always good to keep issuing account separate and use assets from distributing account.
Following tasks required:
1. Create issuer and distribution account. 2. Add trust
3. Issue Token
4. Freeze total supply
5. Selling token and accepting XLM
Accounts are the central data structure in Stellar. Accounts are identified by a public key and saved in the ledger and everything in the ledger is owned by a particular account. Account access is controlled by public/private key cryptography. For an account to perform a transaction–e.g., make a payment–the transaction must be signed by the private key that corresponds to that account’s public key.
Accounts have the following fields:
Account ID
The public key that was first used to create the account. You can replace the key used for signing the account’s transactions with a different public key, but the original account ID will always be used to identify the account.
Balance
The number of lumens held by the account. The balance is denominated in 1/10,000,000th of a lumen, the smallest divisible unit of a lumen.
Sequence number
The current transaction sequence number of the account. This number starts equal to the ledger number at which the account was created.
Number of subentries
Number of other entries the account owns. This number is used to calculate the account’s minimum balance.
Inflation destination
(optional) Account designated to receive inflation. Every account can vote to send inflation to a destination account.
Flags
Currently there are three flags, used by issuers of assets.
- Authorization required (0x1): Requires the issuing account to give other accounts permission before they can hold the issuing account’s credit.
- Authorization revocable (0x2): Allows the issuing account to revoke its credit held by other accounts.
- Authorization immutable (0x4): If this is set then none of the authorization flags can be set and the account can never be deleted.
Home domain
A domain name that can optionally be added to the account. Clients can look up a stellar.toml from this domain. This should be in the format of a fully qualified domain name such as example.com. The federation protocol can use the home domain to look up more details about a transaction’s memo or address details about an account. For more on federation, see the federation guide.
Thresholds
Operations have varying levels of access. This field specifies thresholds for low-, medium-, and high-access levels, as well as the weight of the master key. For more info, see multi-sig.
Signers
Used for multi-sig. This field lists other public keys and their weights, which can be used to authorize transactions for this account.
The process for creating issuing account and distributing account are same, its just a general concept to keep things separate. Save details of this account as well, we will be using this account to sell tokens. Follow the below instructions to create issuer and distribution accounts.
Steps
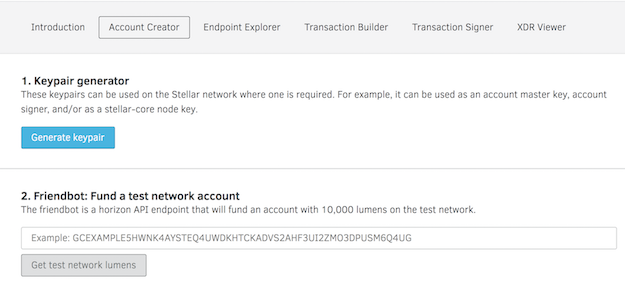
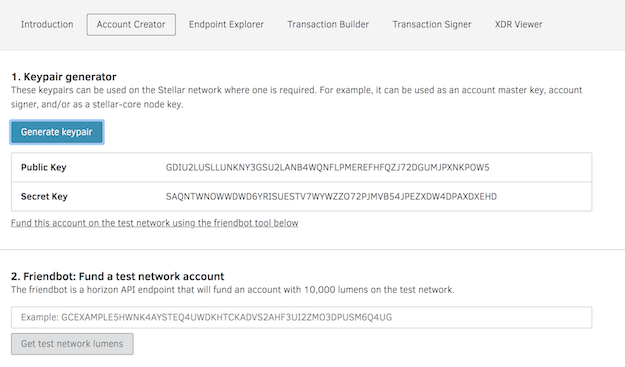
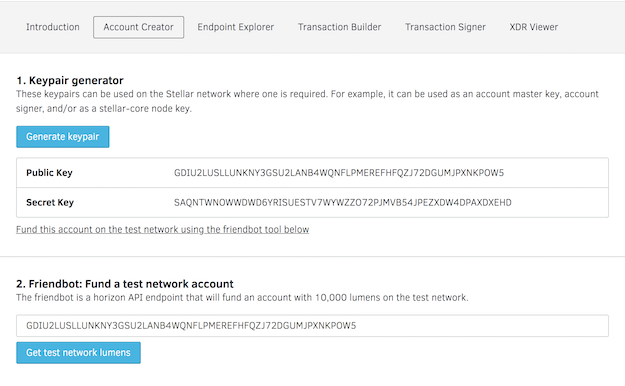
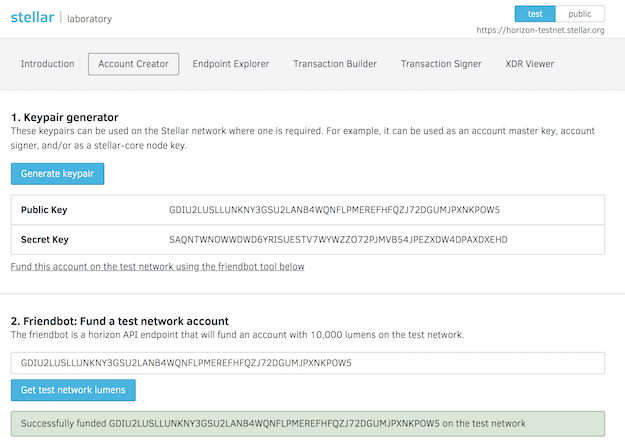
1. Goto https://www.stellar.org/laboratory/
2. Click on account creator tab.
3. Generate key pair - Save the public address and secret.
4. Fund the test Account - Use Friendbot available on the same tab to fund the test account.
Images are attached explaining screen flow.
The issuer test account details can be viewed by using GET URL
https://horizon-testnet.stellar.org/accounts/GBCVYWPJWSHBZCON75LQY5ZW7JWZRA63YU4EEILGFHZENMPZRT25PWQW
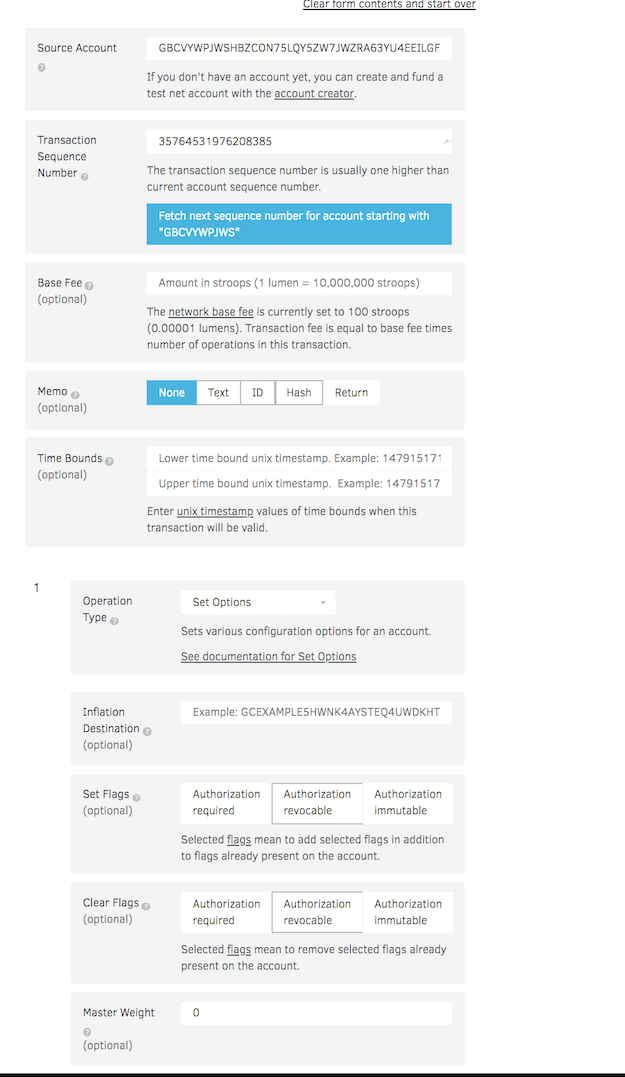
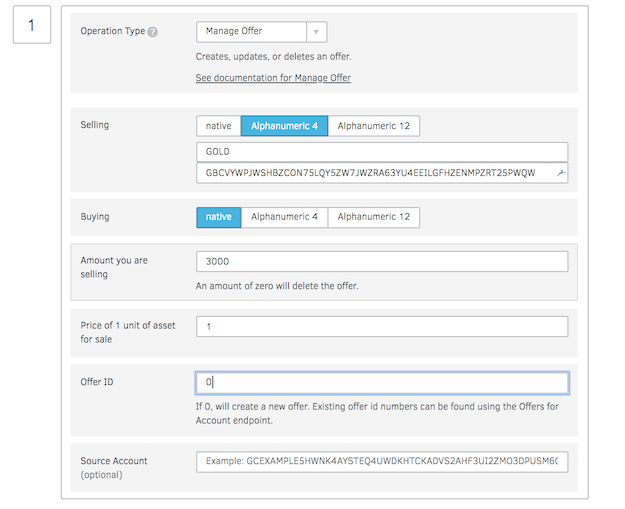
The distribution needs to trust the asset to receive tokens from issuing account. When someone buys token from the exchange they are already trusting the asset, but someone who has not purchased the asset before has to add the trustline in order to receive your tokens. Adding trust is easy as creating a transaction on stellar network.
Go to the Transaction builder tab in the laboratory and fill in the following
1. Source account with distributing account number.
2. Click on “Fetch next sequence number ….”
3. Change operation type to “Change Trust”
4. Provide Asset code e.g: GOLD
5. Click on Sign in Transaction signer
If the transaction is successful you have successfully added trust for the new asset, which issuing account is about to send.

Assets
The Stellar distributed network can be used to track, hold, and transfer any type of asset: dollars, euros, bitcoin, stocks, gold, and other tokens of value. Any asset on the network can be traded and exchanged with any other. Other than lumens (see below), all assets have
- Asset type: e.g., USD or BTC
- Issuer: the account that created the asset
Trustlines
When you hold assets in Stellar, you’re actually holding credit from a particular issuer. The issuer has agreed that it will trade you its credit on the Stellar network for the corresponding asset–e.g., fiat currency, precious metal–outside of Stellar. When you hold an asset, you must trust the issuer to properly redeem its credit. Since users of Stellar will not want to trust just any issuer, accounts must explicitly trust an issuing account before they’re able to hold the issuer’s credit.
Lumens (XLM)
Lumens (XLM) are the native currency of the network. A lumen is the only asset type that can be used on the Stellar network that doesn’t require an issuer or a trustline. Any account can hold lumens. You can trade lumens for other assets in the network.
Anchors: issuing assets
Any account can issue assets on the Stellar network. Entities that issue assets are called anchors. Anchors can be run by individuals, small businesses, local communities, nonprofits, organizations, etc. Any type of financial institution–a bank, a payment processor–can be an anchor. Each anchor has an issuing account from which it issues the asset. As an anchor, when you issue an asset, you give it an asset code. Assets are uniquely identified by the asset code and the issuer. Ultimately, it’s up to the issuer to set the asset code. By convention, however, currencies should be represented by the appropriate ISO 4217 code. For stocks and bonds, use the appropriate ISIN number. For your orange, goat, favor, or beer anchors, you’re on your own–invent an appropriate code!
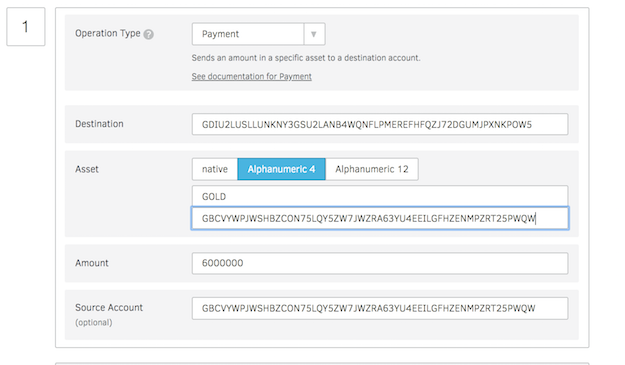
This section describe the payment process to the distributing account from issuing account of total tokens you want to generate. Go to transaction builder and refer below screen to fill up the form. Enter source address as issuing account address, fetch the next transaction number and than set option. After filling the information click on Sign in Transaction signers. If the transaction is successful you have successfully created a token on Stellar platform and sent it to distributing account from where it can be sold.
After completing the payment the issuing account should be freezes so no more tokens can be generated later. See below screen to set the freeze process.
Using Stellar decentralized exchange, you can put a sell order with desired price and any one can buy the tokens. This accepts in XLM (native option) in Stellar platform. To accept in BTC/ETH need more development effort required.
The advantages are:
• Less transaction fees
• Perform almost 100 time faster
• Less development effort to get ICO online.
• Tokens are available on Stellar Distributed Exchange in a day, where anyone can trade without waiting for it to get listed on other exchanges.
Stellar is an infrastructure for payments; connects banks, payments systems and people around the world, designed from the start to make it really easy for financial institutions to issue tokens representing fiat currencies. Also has built in distributed exchange which allows people to not only buy and sell currencies like in a typical foreign exchange way but also to seamlessly convert from one currency to another during cross border or cross currency transactions.
In this blog I have described how to create custom token on Stellar Network and accepting BTC/ETH contributions in an ICO. We will be using stellar laboratory and test network for this article. The functionalities provided here can be done through Stellar SDK as well. We need two accounts on Stellar to proceed, one is “Issuing account” and another is “Distributing account”. Although you could create tokens using one account but its always good to keep issuing account separate and use assets from distributing account.
Following tasks required:
1. Create issuer and distribution account. 2. Add trust
3. Issue Token
4. Freeze total supply
5. Selling token and accepting XLM
Create issuer and distribution account
Accounts are the central data structure in Stellar. Accounts are identified by a public key and saved in the ledger and everything in the ledger is owned by a particular account. Account access is controlled by public/private key cryptography. For an account to perform a transaction–e.g., make a payment–the transaction must be signed by the private key that corresponds to that account’s public key.
Accounts have the following fields:
Account ID
The public key that was first used to create the account. You can replace the key used for signing the account’s transactions with a different public key, but the original account ID will always be used to identify the account.
Balance
The number of lumens held by the account. The balance is denominated in 1/10,000,000th of a lumen, the smallest divisible unit of a lumen.
Sequence number
The current transaction sequence number of the account. This number starts equal to the ledger number at which the account was created.
Number of subentries
Number of other entries the account owns. This number is used to calculate the account’s minimum balance.
Inflation destination
(optional) Account designated to receive inflation. Every account can vote to send inflation to a destination account.
Flags
Currently there are three flags, used by issuers of assets.
- Authorization required (0x1): Requires the issuing account to give other accounts permission before they can hold the issuing account’s credit.
- Authorization revocable (0x2): Allows the issuing account to revoke its credit held by other accounts.
- Authorization immutable (0x4): If this is set then none of the authorization flags can be set and the account can never be deleted.
Home domain
A domain name that can optionally be added to the account. Clients can look up a stellar.toml from this domain. This should be in the format of a fully qualified domain name such as example.com. The federation protocol can use the home domain to look up more details about a transaction’s memo or address details about an account. For more on federation, see the federation guide.
Thresholds
Operations have varying levels of access. This field specifies thresholds for low-, medium-, and high-access levels, as well as the weight of the master key. For more info, see multi-sig.
Signers
Used for multi-sig. This field lists other public keys and their weights, which can be used to authorize transactions for this account.
The process for creating issuing account and distributing account are same, its just a general concept to keep things separate. Save details of this account as well, we will be using this account to sell tokens. Follow the below instructions to create issuer and distribution accounts.
Steps
1. Goto https://www.stellar.org/laboratory/
2. Click on account creator tab.
3. Generate key pair - Save the public address and secret.
4. Fund the test Account - Use Friendbot available on the same tab to fund the test account.
Images are attached explaining screen flow.
The issuer test account details can be viewed by using GET URL
https://horizon-testnet.stellar.org/accounts/GBCVYWPJWSHBZCON75LQY5ZW7JWZRA63YU4EEILGFHZENMPZRT25PWQW
Add trust
The distribution needs to trust the asset to receive tokens from issuing account. When someone buys token from the exchange they are already trusting the asset, but someone who has not purchased the asset before has to add the trustline in order to receive your tokens. Adding trust is easy as creating a transaction on stellar network.
Go to the Transaction builder tab in the laboratory and fill in the following
1. Source account with distributing account number.
2. Click on “Fetch next sequence number ….”
3. Change operation type to “Change Trust”
4. Provide Asset code e.g: GOLD
5. Click on Sign in Transaction signer
If the transaction is successful you have successfully added trust for the new asset, which issuing account is about to send.
Assets
The Stellar distributed network can be used to track, hold, and transfer any type of asset: dollars, euros, bitcoin, stocks, gold, and other tokens of value. Any asset on the network can be traded and exchanged with any other. Other than lumens (see below), all assets have
- Asset type: e.g., USD or BTC
- Issuer: the account that created the asset
Trustlines
When you hold assets in Stellar, you’re actually holding credit from a particular issuer. The issuer has agreed that it will trade you its credit on the Stellar network for the corresponding asset–e.g., fiat currency, precious metal–outside of Stellar. When you hold an asset, you must trust the issuer to properly redeem its credit. Since users of Stellar will not want to trust just any issuer, accounts must explicitly trust an issuing account before they’re able to hold the issuer’s credit.
Lumens (XLM)
Lumens (XLM) are the native currency of the network. A lumen is the only asset type that can be used on the Stellar network that doesn’t require an issuer or a trustline. Any account can hold lumens. You can trade lumens for other assets in the network.
Anchors: issuing assets
Any account can issue assets on the Stellar network. Entities that issue assets are called anchors. Anchors can be run by individuals, small businesses, local communities, nonprofits, organizations, etc. Any type of financial institution–a bank, a payment processor–can be an anchor. Each anchor has an issuing account from which it issues the asset. As an anchor, when you issue an asset, you give it an asset code. Assets are uniquely identified by the asset code and the issuer. Ultimately, it’s up to the issuer to set the asset code. By convention, however, currencies should be represented by the appropriate ISO 4217 code. For stocks and bonds, use the appropriate ISIN number. For your orange, goat, favor, or beer anchors, you’re on your own–invent an appropriate code!
Issue Token
This section describe the payment process to the distributing account from issuing account of total tokens you want to generate. Go to transaction builder and refer below screen to fill up the form. Enter source address as issuing account address, fetch the next transaction number and than set option. After filling the information click on Sign in Transaction signers. If the transaction is successful you have successfully created a token on Stellar platform and sent it to distributing account from where it can be sold.
Freeze total supply
After completing the payment the issuing account should be freezes so no more tokens can be generated later. See below screen to set the freeze process.
Selling token and accepting XLM
Using Stellar decentralized exchange, you can put a sell order with desired price and any one can buy the tokens. This accepts in XLM (native option) in Stellar platform. To accept in BTC/ETH need more development effort required.
References
- Concepts definitions are from Stellar site : https://www.stellar.org/developers/guides/concepts/accounts.html
- Create ICO blog from Ashish Prajapati : https://medium.com/@ashisherc/create-an-ico-on-stellar-network-with-custom-token-7b6aab349f33
Blockchain Architecture - Part 2: Application Templates
01/02/18 01:30 Filed in: Blockchain
On building a blockchain application, following stages can be applied.
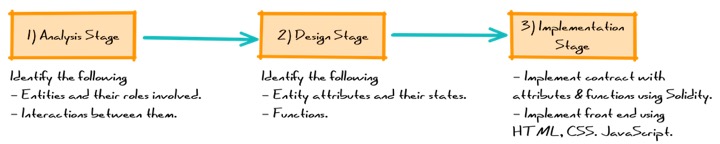
Analysis Stage: Identify the entities involved, their roles and types of interactions between them.
Design Stage: Model the entity attributes as state variable and interactions between them as functions. Also capture dependencies and constraints.
Implementation Stage: Implement the contract, front-end and back-end application.
The templates are defined below:
One-to-One: TBD
Many-to-One: TBD
Many-to-Many:TBD
Blockchain Architecture - Part 1: Introduction
04/01/18 22:23 Filed in: Blockchain
Part 2: Application Templates
Blockchain is a distributed and public ledger which maintains records of all transactions. A blockchain network is a truly peer-to-peer network and it does not require a trusted central authority intermediaries to authenticate or control the network infrastructure. With the blockchain’s ability to establish trust in a peer-to-peer network through a distributed consensus mechanism rather than relying on central authority. Blockchain has the potential to distrust not just the financial industry but also other industries including manufacturing, supply chain, logistics and healthcare.
There are two main parts in the Blockchain: the blockchain network, and the blockchain code. The blockchain network is the infrastructure where group of organizations to share data and processes together on a blockchain. The blockchain code runs on the blockchain network, and defines the organizations who can participate in the network. There are different categories of Blockchain including permissive (private), and public Blockchain models. A public blockchain network is completely open and anyone can join and participate in the network. The network typically has an incentivizing mechanism to encourage more participants to join the network. Bitcoin is one of the largest public blockchain networks in production today. A private blockchain network requires an invitation and must be validated by either the network starter or by a set of rules put in place by the network starter. Businesses who set up a private blockchain, will generally set up a permission network. This places restrictions on who is allowed to participate in the network, and only in certain transactions. Participants need to obtain an invitation or permission to join.
Blockchain operates on technology stack described below.
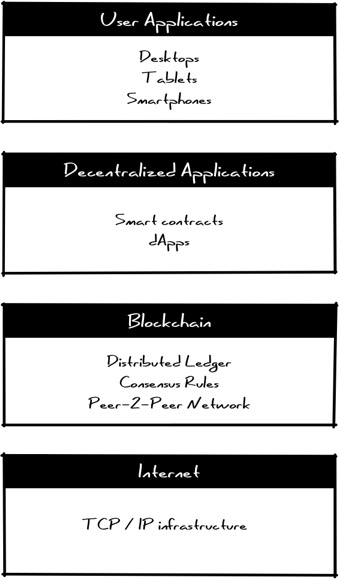
The blockchain protocol operates on top of internet stack through a peer-to-peer network of nodes. The stack is responsible for executing protocol, completing transactions based on a cryptographic consensus algorithm. The recorded transactions cannot be changed and can be inspected by anyone.
Decentralized applications (dApps) are applications that run on a P2P network of computers rather than a single computer. dApps are similar to a conventional web application. The front end uses the exact same technology to render the page. The one critical difference is that instead of an API connecting to a Database, you have a Smart Contract connecting to a blockchain. dApp enabled website: Front End → Smart Contract → Blockchain. As opposed to traditional, centralized applications, where the backend code is running on centralized servers, dApps have their backend code running on a decentralized P2P network. Customer interaction is done through user application layer. This is the consumer-facing part of the stack. These applications will work similar to current web or mobile applications but the main difference is they are built on decentralized protocols will be able to talk to each other.
Blockchain is a distributed and public ledger which maintains records of all transactions. A blockchain network is a truly peer-to-peer network and it does not require a trusted central authority intermediaries to authenticate or control the network infrastructure. With the blockchain’s ability to establish trust in a peer-to-peer network through a distributed consensus mechanism rather than relying on central authority. Blockchain has the potential to distrust not just the financial industry but also other industries including manufacturing, supply chain, logistics and healthcare.
There are two main parts in the Blockchain: the blockchain network, and the blockchain code. The blockchain network is the infrastructure where group of organizations to share data and processes together on a blockchain. The blockchain code runs on the blockchain network, and defines the organizations who can participate in the network. There are different categories of Blockchain including permissive (private), and public Blockchain models. A public blockchain network is completely open and anyone can join and participate in the network. The network typically has an incentivizing mechanism to encourage more participants to join the network. Bitcoin is one of the largest public blockchain networks in production today. A private blockchain network requires an invitation and must be validated by either the network starter or by a set of rules put in place by the network starter. Businesses who set up a private blockchain, will generally set up a permission network. This places restrictions on who is allowed to participate in the network, and only in certain transactions. Participants need to obtain an invitation or permission to join.
Blockchain operates on technology stack described below.
The blockchain protocol operates on top of internet stack through a peer-to-peer network of nodes. The stack is responsible for executing protocol, completing transactions based on a cryptographic consensus algorithm. The recorded transactions cannot be changed and can be inspected by anyone.
Decentralized applications (dApps) are applications that run on a P2P network of computers rather than a single computer. dApps are similar to a conventional web application. The front end uses the exact same technology to render the page. The one critical difference is that instead of an API connecting to a Database, you have a Smart Contract connecting to a blockchain. dApp enabled website: Front End → Smart Contract → Blockchain. As opposed to traditional, centralized applications, where the backend code is running on centralized servers, dApps have their backend code running on a decentralized P2P network. Customer interaction is done through user application layer. This is the consumer-facing part of the stack. These applications will work similar to current web or mobile applications but the main difference is they are built on decentralized protocols will be able to talk to each other.