Setup Saltstack
28/04/19 21:39 Filed in: Devops
In this article, I'll provide step-by-step instructions to setup Salt master and 1 minion in two VM instances.
Before start, I assume
- Two VM has been setup in CentOS 7 or above
- Non-root sudo user in the system
- Both server are able to communicate
The summary of two servers are
Master
- OS: CentOS 7
- Hostname: rm-dev01
- IP address: 192.168.4.136
Minion
- OS: CentOS 7
- Hostname: rm-dev02
- IP address: 192.168.4.137
#Step 1:
#Update with latest stable releases.
sudo yum update -y && sudo reboot
#After reboot complete sign in with sudo user.
#Step 2:
#Setup Saltmaster
sudo yum install salt-master
#Step 3:
#Setup master configuration settings
sudo vi /etc/salt/master
#Replace following line "#interface: 0.0.0.0" with
interface: 192.168.4.136
#Find "#hash_type: md5" and replace with
hash_type: sha256
#Save and quit
#Enable as service
sudo systemctl start salt-master.service
sudo systemctl enable salt-master.service
#Step 4:
#Modify firewall rules
#By default, the salt-master service will use ports 4505 and 4506 to communicate with minions. You need to allow traffic through the two ports on the master server. Find out to which zone the eth1 interface belongs:
sudo firewall-cmd --get-active-zones
#You will find out that the eth1 interface belongs to the "public" zone. Therefore, you need to allow traffic through the two ports in the "public" zone:
sudo firewall-cmd --permanent --zone=public --add-port=4505-4506/tcp
sudo firewall-cmd --reload
#Step 5:
#Setting up minion
sudo yum install salt-minion
#After the installation, modify the configuration file as below:
sudo vi /etc/salt/minion
#Find:
#master: salt
#Replace the line with:
master: 10.99.0.10
#Find: "#hash_type: sha256" replace the line with:
hash_type: sha256
#Save and quit:
#Start and enable the salt-minion service:
sudo systemctl start salt-minion.service
sudo systemctl enable salt-minion.service
#After starting up, the salt-minion service will send off a signal to find the SaltStack server.
#list keys
sudo salt-key -L
#you may see following result
Accepted Keys:
Denied Keys:
Unaccepted Keys:
rm-dev02
Rejected Keys:
# accept the key
sudo salt-key --accept=rm-dev02
# You should see following
The following keys are going to be accepted:
Unaccepted Keys:
rm-dev02
Proceed? [n/Y] y
Key for minion rm-dev02 accepted.
#type following
sudo salt-key -L
#this should show
Accepted Keys:
rm-dev02
Denied Keys:
Unaccepted Keys:
Rejected Keys:
Benefits of Golang
01/08/18 22:27 Filed in: Programming | Golang
Go is an open source programming language that makes it easy to build simple, reliable, efficient software and provides a robust development experience and avoids many issues that existing programming languages have. The strengths of Go are that it
Easy to learn
Go is so small and simple that the entire language and its underlying concepts can be studied in just a couple of days
Built-in concurrency
Go was written in the age of multi-core CPUs and has easy, high-level CSP-style concurrency built into the language compared the other languages Java, JavaScript, Python, Ruby, C, C++ have been designed in the 1980s-2000s when most CPUs had only one compute core.
Uses OO — the good parts
Go takes a fresh approach at object-orientation with those learnings in mind. It keeps the good parts like encapsulation and message passing. Go avoids inheritance because it is now considered harmful and provides first-class support for composition instead.
Modern standard library
Languages including Java, JavaScript, Python, Ruby were designed before the internet was the ubiquitous computing platform it is today. Hence, the standard libraries of these languages provide only relatively generic support for networking that isn’t optimized for the modern internet. Go was created a decade ago when the internet was already in full swing. Go’s standard library allows creating even sophisticated network services without third-party libraries.
Extremely fast compiler
Go is designed from the ground up to make compilation efficient and as a result its compiler is so fast that there are almost no compilation delays. This gives a Go developer instant feedback similar to scripting languages, with the added benefits of static type checking.
Easy cross compilation
Go supports compilation to many platforms like macOS, Linux, Windows, BSD, ARM, and more. Go can compile binaries for all these platforms out of the box. This makes deployment from a single machine easy.
Executes very fast
Go runs close to the speed of C. Unlike JITed languages (Java, JavaScript, Python, etc), Go binaries require no startup or warmup time because they ship as compiled and fully optimized native code
Small memory footprint & deployment size
Runtimes like the JVM, Python, or Node don’t just load your program code when running it. They also load large and highly complex pieces of infrastructure to compile and optimize your program each time you run it. This makes their startup time slower and causes them to use large amounts (hundreds of MB) of RAM. Go processes have less overhead because they are already fully compiled and optimized and just need to run
Create private ethereum in Mac environment
21/04/18 09:07 Filed in: Blockchain
Using homebrew is easier to setup. To setup brew in your Mac try this https://brew.sh/
$brew update
$brew upgrade
$brew tap ethereum/ethereum
$brew install ethereum
For this setup I use ~/code/ethereum as my root directory for development setup. Create devethchain directory.
$mkdir devethchain
Create accounts
$geth --datadir ~/code/ethereum/devethchain account new

Create multiple accounts. After creating if you list files in keystore, you should see following files
$ls -l keystore

Get the account ID
In genesis file following values can be filled in
- chainId — chain’s identifier, is used in replay protection.
- homesteadBlock, eip155Block, eip158Block, byzantiumBlock — these relate to chain forking and versioning, for new blockchain leave them as 0 value.
This is to mine a block. Setting this value low (~10–10000) is helpful in a private blockchain as it lets you mine blocks quickly, which equals fast transactions, and plenty of ETH to test with. For comparison, the Ethereum mainnet Genesis file defines a difficulty of 17179869184.
This is the the total amount of gas that can be used in each block. With such a low mining difficulty, blocks will be moving pretty quick, but you should still set this value pretty high to avoid hitting the limit and slowing down your network.
Here you can allocate ETH to specific addresses you have created before. You will need to add the account to your private chain in order to use it, and to do that you need access to the keystore/utc file. The addresses provided are not real addresses, they are just examples. Here we allocate 100,000 and 120,000 ETH respectively.
$cd ~/code/ethereum/devethchain
$touch devgenesis.json
Add following into devgenesis.json file
{
"config": {
"chainId": 1966,
"homesteadBlock": 0,
"eip155Block": 0,
"eip158Block": 0,
"byzantiumBlock": 0
},
"difficulty": "400",
"gasLimit": "2000000",
"alloc": {
"b0f4aa6ba57c075f596af7e56d4c63ca986fc0e5": {
"balance": "100000000000000000000000"
},
"b2be78f4cac00988250aaaa1c7001e199b426c3b": {
"balance": "120000000000000000000000"
}
}
}
geth --datadir ~/code/ethereum/devethchain init ~/code/ethereum/devethchain/devgenesis.json

Start private chain
To keep private network you have to provide Networkid value. You can use any number here, I have used 196609, but other peers joining your network must use the same one.
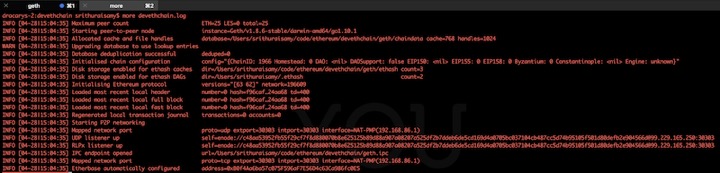
geth --datadir ~/code/ethereum/devethchain --networkid 196609 console 2>> devethchain.log

Output should be like above. This is the geth JavaScript console. Any command with the symbol > should be typed here.
To view logs, open another terminal and tail the log file created after starting the private chain. The log file should be similar to below.
You can create new account in the java script console or import UTC file into keystone directory. I'm going to use one of account as default account created in genesis Gile.
Find default account, type the following command in javascript console.
>eth.coinbase
This will display first account in alloc. Incase if you want to change second one type following in javascript console.
>miner.setEtherbase(web3.eth.accounts[1])
To check the balance
>eth.getBalance(eth.coinbase)
To start the mining
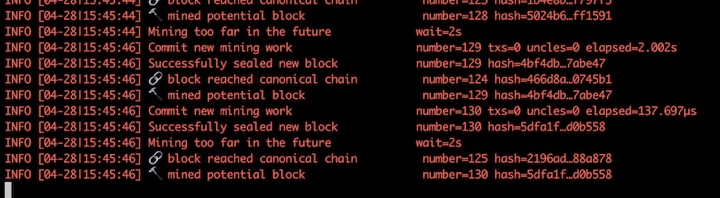
>miner.start()
In the other terminal you can see the mining action in the log file as below.
If you want to stop mining
To get node info
>admin.nodeInfo.enode
You may see message similar to below with different address.
"enode://c48aa53952fb55f29cf7f8d880070b8e625125b89d88a907a08207a525df2b7ddeb6de5cd169d4a0705bc037104cb487cc5d74b95105f501d80defb2e904566d@[::]:30303"
This information you may need to add more peers
Install geth
$brew update
$brew upgrade
$brew tap ethereum/ethereum
$brew install ethereum
For this setup I use ~/code/ethereum as my root directory for development setup. Create devethchain directory.
$mkdir devethchain
Create accounts
$geth --datadir ~/code/ethereum/devethchain account new
Create multiple accounts. After creating if you list files in keystore, you should see following files
$ls -l keystore
Get the account ID
Create Genesis file
In genesis file following values can be filled in
config
- chainId — chain’s identifier, is used in replay protection.
- homesteadBlock, eip155Block, eip158Block, byzantiumBlock — these relate to chain forking and versioning, for new blockchain leave them as 0 value.
difficulty
This is to mine a block. Setting this value low (~10–10000) is helpful in a private blockchain as it lets you mine blocks quickly, which equals fast transactions, and plenty of ETH to test with. For comparison, the Ethereum mainnet Genesis file defines a difficulty of 17179869184.
gasLimit
This is the the total amount of gas that can be used in each block. With such a low mining difficulty, blocks will be moving pretty quick, but you should still set this value pretty high to avoid hitting the limit and slowing down your network.
alloc
Here you can allocate ETH to specific addresses you have created before. You will need to add the account to your private chain in order to use it, and to do that you need access to the keystore/utc file. The addresses provided are not real addresses, they are just examples. Here we allocate 100,000 and 120,000 ETH respectively.
$cd ~/code/ethereum/devethchain
$touch devgenesis.json
Add following into devgenesis.json file
{
"config": {
"chainId": 1966,
"homesteadBlock": 0,
"eip155Block": 0,
"eip158Block": 0,
"byzantiumBlock": 0
},
"difficulty": "400",
"gasLimit": "2000000",
"alloc": {
"b0f4aa6ba57c075f596af7e56d4c63ca986fc0e5": {
"balance": "100000000000000000000000"
},
"b2be78f4cac00988250aaaa1c7001e199b426c3b": {
"balance": "120000000000000000000000"
}
}
}
Initialize your node
geth --datadir ~/code/ethereum/devethchain init ~/code/ethereum/devethchain/devgenesis.json
Start private chain
To keep private network you have to provide Networkid value. You can use any number here, I have used 196609, but other peers joining your network must use the same one.
geth --datadir ~/code/ethereum/devethchain --networkid 196609 console 2>> devethchain.log
Output should be like above. This is the geth JavaScript console. Any command with the symbol > should be typed here.
To view logs, open another terminal and tail the log file created after starting the private chain. The log file should be similar to below.
You can create new account in the java script console or import UTC file into keystone directory. I'm going to use one of account as default account created in genesis Gile.
Find default account, type the following command in javascript console.
>eth.coinbase
This will display first account in alloc. Incase if you want to change second one type following in javascript console.
>miner.setEtherbase(web3.eth.accounts[1])
To check the balance
>eth.getBalance(eth.coinbase)
To start the mining
>miner.start()
In the other terminal you can see the mining action in the log file as below.
If you want to stop mining
To get node info
>admin.nodeInfo.enode
You may see message similar to below with different address.
"enode://c48aa53952fb55f29cf7f8d880070b8e625125b89d88a907a08207a525df2b7ddeb6de5cd169d4a0705bc037104cb487cc5d74b95105f501d80defb2e904566d@[::]:30303"
This information you may need to add more peers
Dependency management in Golang
15/04/18 18:14 Filed in: Golang
Glide was one of the top tool for dependency management for Go. The Glide may become obsolete because of Dev packages introduced in Golang.
dep is a prototype dependency management tool for Go. It requires Go 1.9 or newer to compile. dep is safe for production use. Initially there was planning to integrate deployment into go 1.10.x version but still it has long way. So now you have to install and use separately.
Following are the examples for dep command.
dep init set up a new project
dep ensure install the project's dependencies
dep ensure -update update the locked versions of all dependencies
dep ensure -add github.com/pkg/errors add a dependency to the project
- Message from Glide team :
dep is a prototype dependency management tool for Go. It requires Go 1.9 or newer to compile. dep is safe for production use. Initially there was planning to integrate deployment into go 1.10.x version but still it has long way. So now you have to install and use separately.
Install dep package
- $ brew install dep
- $ brew upgrade dep
Create the project inside $GOPATH
- Create new project under $GOPATH/src/elasticcloudapps.com/hellodep
- package main
- import (
- )
- func main() {
- }
- Initialize dep
- Dep needs two files called Gopkg.lock and Gopkg.toml. You can initialize these files with following
- $ dep init
- Locking in master (d644981) for transitive dep golang.org/x/crypto
- Locking in master (2281fa9) for transitive dep golang.org/x/sys
- Using ^1.0.5 as constraint for direct dep github.com/sirupsen/logrus
- Locking in v1.0.5 (c155da1) for direct dep github.com/sirupsen/logrus
- After this the new files will be generated.
Following are the examples for dep command.
dep init set up a new project
dep ensure install the project's dependencies
dep ensure -update update the locked versions of all dependencies
dep ensure -add github.com/pkg/errors add a dependency to the project
Easy way to create ICO on Stellar network
07/04/18 21:54 Filed in: Blockchain
An Initial Coin Offering (ICO) is used by startups to bypass the rigorous and regulated capital-raising process required by venture capitalists or banks. In an ICO campaign, a percentage of the cryptocurrency is sold to early backers of the project in exchange for legal tender or other cryptocurrencies. The majority of the ICOs today are made on Ethereum (ERC20 token). But Ethereum is slow running transaction with high cost. If required to raise funds for the startup then Stellar can do a lot faster, better and cheaper, it is an open source platform for developing financial applications.
The advantages are:
• Less transaction fees
• Perform almost 100 time faster
• Less development effort to get ICO online.
• Tokens are available on Stellar Distributed Exchange in a day, where anyone can trade without waiting for it to get listed on other exchanges.
Stellar is an infrastructure for payments; connects banks, payments systems and people around the world, designed from the start to make it really easy for financial institutions to issue tokens representing fiat currencies. Also has built in distributed exchange which allows people to not only buy and sell currencies like in a typical foreign exchange way but also to seamlessly convert from one currency to another during cross border or cross currency transactions.
In this blog I have described how to create custom token on Stellar Network and accepting BTC/ETH contributions in an ICO. We will be using stellar laboratory and test network for this article. The functionalities provided here can be done through Stellar SDK as well. We need two accounts on Stellar to proceed, one is “Issuing account” and another is “Distributing account”. Although you could create tokens using one account but its always good to keep issuing account separate and use assets from distributing account.
Following tasks required:
1. Create issuer and distribution account. 2. Add trust
3. Issue Token
4. Freeze total supply
5. Selling token and accepting XLM
Accounts are the central data structure in Stellar. Accounts are identified by a public key and saved in the ledger and everything in the ledger is owned by a particular account. Account access is controlled by public/private key cryptography. For an account to perform a transaction–e.g., make a payment–the transaction must be signed by the private key that corresponds to that account’s public key.
Accounts have the following fields:
Account ID
The public key that was first used to create the account. You can replace the key used for signing the account’s transactions with a different public key, but the original account ID will always be used to identify the account.
Balance
The number of lumens held by the account. The balance is denominated in 1/10,000,000th of a lumen, the smallest divisible unit of a lumen.
Sequence number
The current transaction sequence number of the account. This number starts equal to the ledger number at which the account was created.
Number of subentries
Number of other entries the account owns. This number is used to calculate the account’s minimum balance.
Inflation destination
(optional) Account designated to receive inflation. Every account can vote to send inflation to a destination account.
Flags
Currently there are three flags, used by issuers of assets.
- Authorization required (0x1): Requires the issuing account to give other accounts permission before they can hold the issuing account’s credit.
- Authorization revocable (0x2): Allows the issuing account to revoke its credit held by other accounts.
- Authorization immutable (0x4): If this is set then none of the authorization flags can be set and the account can never be deleted.
Home domain
A domain name that can optionally be added to the account. Clients can look up a stellar.toml from this domain. This should be in the format of a fully qualified domain name such as example.com. The federation protocol can use the home domain to look up more details about a transaction’s memo or address details about an account. For more on federation, see the federation guide.
Thresholds
Operations have varying levels of access. This field specifies thresholds for low-, medium-, and high-access levels, as well as the weight of the master key. For more info, see multi-sig.
Signers
Used for multi-sig. This field lists other public keys and their weights, which can be used to authorize transactions for this account.
The process for creating issuing account and distributing account are same, its just a general concept to keep things separate. Save details of this account as well, we will be using this account to sell tokens. Follow the below instructions to create issuer and distribution accounts.
Steps
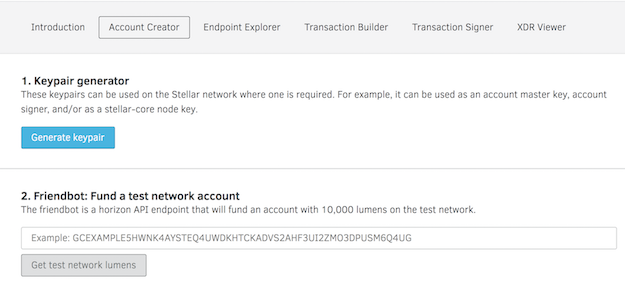
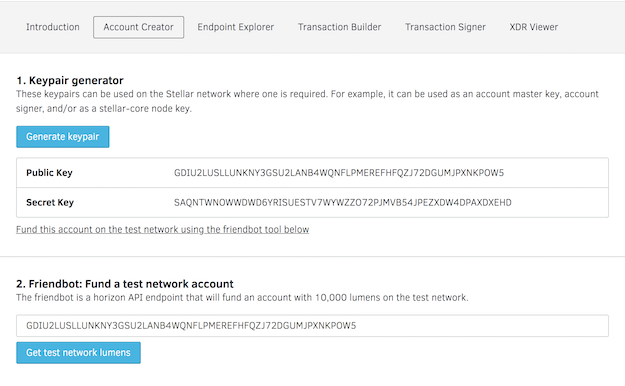
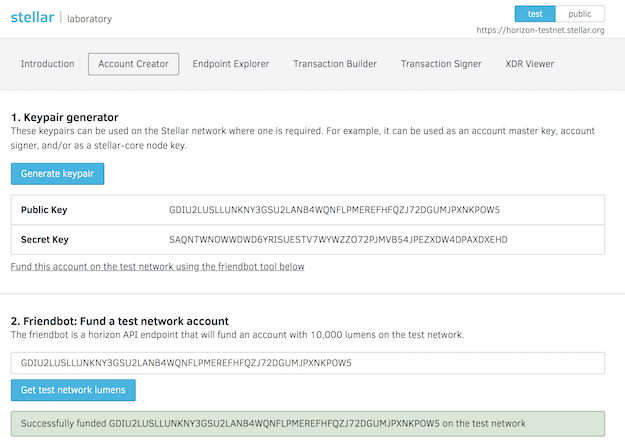
1. Goto https://www.stellar.org/laboratory/
2. Click on account creator tab.
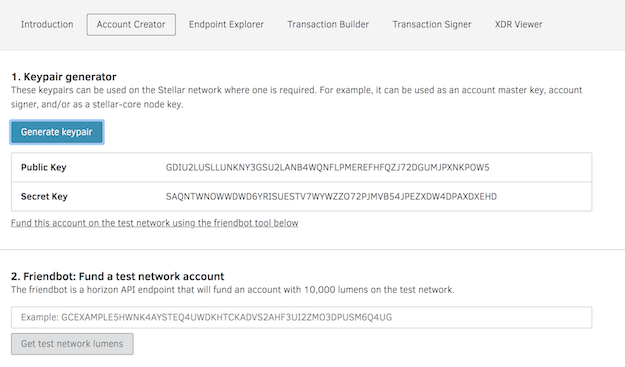
3. Generate key pair - Save the public address and secret.
4. Fund the test Account - Use Friendbot available on the same tab to fund the test account.
Images are attached explaining screen flow.
The issuer test account details can be viewed by using GET URL
https://horizon-testnet.stellar.org/accounts/GBCVYWPJWSHBZCON75LQY5ZW7JWZRA63YU4EEILGFHZENMPZRT25PWQW
The distribution needs to trust the asset to receive tokens from issuing account. When someone buys token from the exchange they are already trusting the asset, but someone who has not purchased the asset before has to add the trustline in order to receive your tokens. Adding trust is easy as creating a transaction on stellar network.
Go to the Transaction builder tab in the laboratory and fill in the following
1. Source account with distributing account number.
2. Click on “Fetch next sequence number ….”
3. Change operation type to “Change Trust”
4. Provide Asset code e.g: GOLD
5. Click on Sign in Transaction signer
If the transaction is successful you have successfully added trust for the new asset, which issuing account is about to send.

Assets
The Stellar distributed network can be used to track, hold, and transfer any type of asset: dollars, euros, bitcoin, stocks, gold, and other tokens of value. Any asset on the network can be traded and exchanged with any other. Other than lumens (see below), all assets have
- Asset type: e.g., USD or BTC
- Issuer: the account that created the asset
Trustlines
When you hold assets in Stellar, you’re actually holding credit from a particular issuer. The issuer has agreed that it will trade you its credit on the Stellar network for the corresponding asset–e.g., fiat currency, precious metal–outside of Stellar. When you hold an asset, you must trust the issuer to properly redeem its credit. Since users of Stellar will not want to trust just any issuer, accounts must explicitly trust an issuing account before they’re able to hold the issuer’s credit.
Lumens (XLM)
Lumens (XLM) are the native currency of the network. A lumen is the only asset type that can be used on the Stellar network that doesn’t require an issuer or a trustline. Any account can hold lumens. You can trade lumens for other assets in the network.
Anchors: issuing assets
Any account can issue assets on the Stellar network. Entities that issue assets are called anchors. Anchors can be run by individuals, small businesses, local communities, nonprofits, organizations, etc. Any type of financial institution–a bank, a payment processor–can be an anchor. Each anchor has an issuing account from which it issues the asset. As an anchor, when you issue an asset, you give it an asset code. Assets are uniquely identified by the asset code and the issuer. Ultimately, it’s up to the issuer to set the asset code. By convention, however, currencies should be represented by the appropriate ISO 4217 code. For stocks and bonds, use the appropriate ISIN number. For your orange, goat, favor, or beer anchors, you’re on your own–invent an appropriate code!
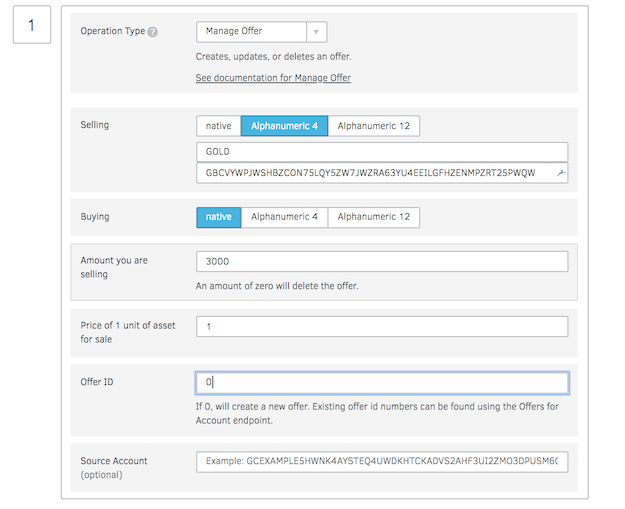
This section describe the payment process to the distributing account from issuing account of total tokens you want to generate. Go to transaction builder and refer below screen to fill up the form. Enter source address as issuing account address, fetch the next transaction number and than set option. After filling the information click on Sign in Transaction signers. If the transaction is successful you have successfully created a token on Stellar platform and sent it to distributing account from where it can be sold.
After completing the payment the issuing account should be freezes so no more tokens can be generated later. See below screen to set the freeze process.
Using Stellar decentralized exchange, you can put a sell order with desired price and any one can buy the tokens. This accepts in XLM (native option) in Stellar platform. To accept in BTC/ETH need more development effort required.
The advantages are:
• Less transaction fees
• Perform almost 100 time faster
• Less development effort to get ICO online.
• Tokens are available on Stellar Distributed Exchange in a day, where anyone can trade without waiting for it to get listed on other exchanges.
Stellar is an infrastructure for payments; connects banks, payments systems and people around the world, designed from the start to make it really easy for financial institutions to issue tokens representing fiat currencies. Also has built in distributed exchange which allows people to not only buy and sell currencies like in a typical foreign exchange way but also to seamlessly convert from one currency to another during cross border or cross currency transactions.
In this blog I have described how to create custom token on Stellar Network and accepting BTC/ETH contributions in an ICO. We will be using stellar laboratory and test network for this article. The functionalities provided here can be done through Stellar SDK as well. We need two accounts on Stellar to proceed, one is “Issuing account” and another is “Distributing account”. Although you could create tokens using one account but its always good to keep issuing account separate and use assets from distributing account.
Following tasks required:
1. Create issuer and distribution account. 2. Add trust
3. Issue Token
4. Freeze total supply
5. Selling token and accepting XLM
Create issuer and distribution account
Accounts are the central data structure in Stellar. Accounts are identified by a public key and saved in the ledger and everything in the ledger is owned by a particular account. Account access is controlled by public/private key cryptography. For an account to perform a transaction–e.g., make a payment–the transaction must be signed by the private key that corresponds to that account’s public key.
Accounts have the following fields:
Account ID
The public key that was first used to create the account. You can replace the key used for signing the account’s transactions with a different public key, but the original account ID will always be used to identify the account.
Balance
The number of lumens held by the account. The balance is denominated in 1/10,000,000th of a lumen, the smallest divisible unit of a lumen.
Sequence number
The current transaction sequence number of the account. This number starts equal to the ledger number at which the account was created.
Number of subentries
Number of other entries the account owns. This number is used to calculate the account’s minimum balance.
Inflation destination
(optional) Account designated to receive inflation. Every account can vote to send inflation to a destination account.
Flags
Currently there are three flags, used by issuers of assets.
- Authorization required (0x1): Requires the issuing account to give other accounts permission before they can hold the issuing account’s credit.
- Authorization revocable (0x2): Allows the issuing account to revoke its credit held by other accounts.
- Authorization immutable (0x4): If this is set then none of the authorization flags can be set and the account can never be deleted.
Home domain
A domain name that can optionally be added to the account. Clients can look up a stellar.toml from this domain. This should be in the format of a fully qualified domain name such as example.com. The federation protocol can use the home domain to look up more details about a transaction’s memo or address details about an account. For more on federation, see the federation guide.
Thresholds
Operations have varying levels of access. This field specifies thresholds for low-, medium-, and high-access levels, as well as the weight of the master key. For more info, see multi-sig.
Signers
Used for multi-sig. This field lists other public keys and their weights, which can be used to authorize transactions for this account.
The process for creating issuing account and distributing account are same, its just a general concept to keep things separate. Save details of this account as well, we will be using this account to sell tokens. Follow the below instructions to create issuer and distribution accounts.
Steps
1. Goto https://www.stellar.org/laboratory/
2. Click on account creator tab.
3. Generate key pair - Save the public address and secret.
4. Fund the test Account - Use Friendbot available on the same tab to fund the test account.
Images are attached explaining screen flow.
The issuer test account details can be viewed by using GET URL
https://horizon-testnet.stellar.org/accounts/GBCVYWPJWSHBZCON75LQY5ZW7JWZRA63YU4EEILGFHZENMPZRT25PWQW
Add trust
The distribution needs to trust the asset to receive tokens from issuing account. When someone buys token from the exchange they are already trusting the asset, but someone who has not purchased the asset before has to add the trustline in order to receive your tokens. Adding trust is easy as creating a transaction on stellar network.
Go to the Transaction builder tab in the laboratory and fill in the following
1. Source account with distributing account number.
2. Click on “Fetch next sequence number ….”
3. Change operation type to “Change Trust”
4. Provide Asset code e.g: GOLD
5. Click on Sign in Transaction signer
If the transaction is successful you have successfully added trust for the new asset, which issuing account is about to send.
Assets
The Stellar distributed network can be used to track, hold, and transfer any type of asset: dollars, euros, bitcoin, stocks, gold, and other tokens of value. Any asset on the network can be traded and exchanged with any other. Other than lumens (see below), all assets have
- Asset type: e.g., USD or BTC
- Issuer: the account that created the asset
Trustlines
When you hold assets in Stellar, you’re actually holding credit from a particular issuer. The issuer has agreed that it will trade you its credit on the Stellar network for the corresponding asset–e.g., fiat currency, precious metal–outside of Stellar. When you hold an asset, you must trust the issuer to properly redeem its credit. Since users of Stellar will not want to trust just any issuer, accounts must explicitly trust an issuing account before they’re able to hold the issuer’s credit.
Lumens (XLM)
Lumens (XLM) are the native currency of the network. A lumen is the only asset type that can be used on the Stellar network that doesn’t require an issuer or a trustline. Any account can hold lumens. You can trade lumens for other assets in the network.
Anchors: issuing assets
Any account can issue assets on the Stellar network. Entities that issue assets are called anchors. Anchors can be run by individuals, small businesses, local communities, nonprofits, organizations, etc. Any type of financial institution–a bank, a payment processor–can be an anchor. Each anchor has an issuing account from which it issues the asset. As an anchor, when you issue an asset, you give it an asset code. Assets are uniquely identified by the asset code and the issuer. Ultimately, it’s up to the issuer to set the asset code. By convention, however, currencies should be represented by the appropriate ISO 4217 code. For stocks and bonds, use the appropriate ISIN number. For your orange, goat, favor, or beer anchors, you’re on your own–invent an appropriate code!
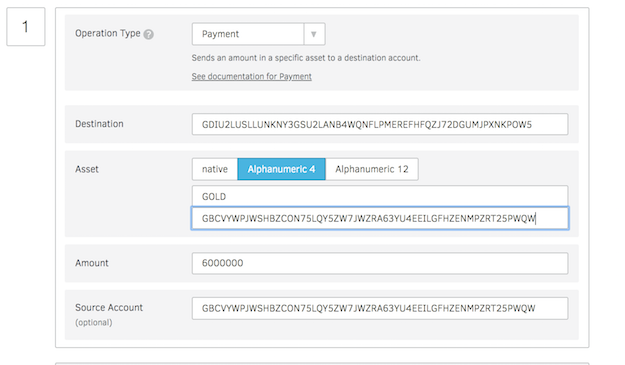
Issue Token
This section describe the payment process to the distributing account from issuing account of total tokens you want to generate. Go to transaction builder and refer below screen to fill up the form. Enter source address as issuing account address, fetch the next transaction number and than set option. After filling the information click on Sign in Transaction signers. If the transaction is successful you have successfully created a token on Stellar platform and sent it to distributing account from where it can be sold.
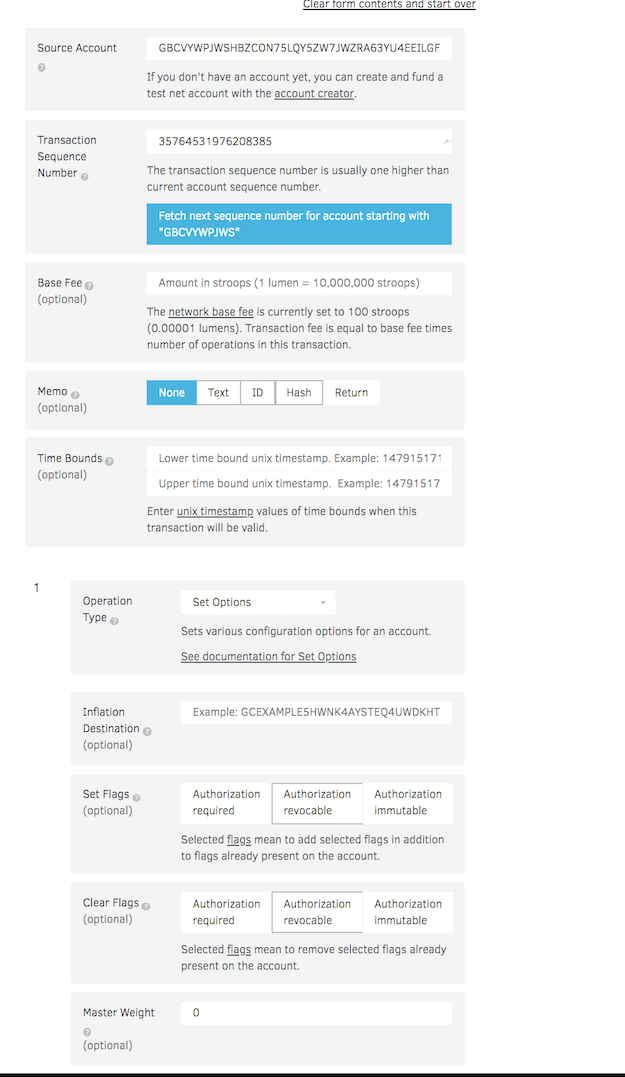
Freeze total supply
After completing the payment the issuing account should be freezes so no more tokens can be generated later. See below screen to set the freeze process.
Selling token and accepting XLM
Using Stellar decentralized exchange, you can put a sell order with desired price and any one can buy the tokens. This accepts in XLM (native option) in Stellar platform. To accept in BTC/ETH need more development effort required.
References
- Concepts definitions are from Stellar site : https://www.stellar.org/developers/guides/concepts/accounts.html
- Create ICO blog from Ashish Prajapati : https://medium.com/@ashisherc/create-an-ico-on-stellar-network-with-custom-token-7b6aab349f33
Blockchain Architecture - Part 2: Application Templates
01/02/18 01:30 Filed in: Blockchain
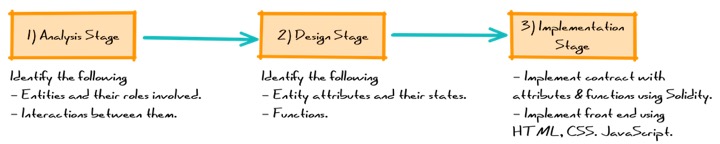
On building a blockchain application, following stages can be applied.
Analysis Stage: Identify the entities involved, their roles and types of interactions between them.
Design Stage: Model the entity attributes as state variable and interactions between them as functions. Also capture dependencies and constraints.
Implementation Stage: Implement the contract, front-end and back-end application.
The templates are defined below:
One-to-One: TBD
Many-to-One: TBD
Many-to-Many:TBD
Blockchain Architecture - Part 1: Introduction
04/01/18 22:23 Filed in: Blockchain
Part 2: Application Templates
Blockchain is a distributed and public ledger which maintains records of all transactions. A blockchain network is a truly peer-to-peer network and it does not require a trusted central authority intermediaries to authenticate or control the network infrastructure. With the blockchain’s ability to establish trust in a peer-to-peer network through a distributed consensus mechanism rather than relying on central authority. Blockchain has the potential to distrust not just the financial industry but also other industries including manufacturing, supply chain, logistics and healthcare.
There are two main parts in the Blockchain: the blockchain network, and the blockchain code. The blockchain network is the infrastructure where group of organizations to share data and processes together on a blockchain. The blockchain code runs on the blockchain network, and defines the organizations who can participate in the network. There are different categories of Blockchain including permissive (private), and public Blockchain models. A public blockchain network is completely open and anyone can join and participate in the network. The network typically has an incentivizing mechanism to encourage more participants to join the network. Bitcoin is one of the largest public blockchain networks in production today. A private blockchain network requires an invitation and must be validated by either the network starter or by a set of rules put in place by the network starter. Businesses who set up a private blockchain, will generally set up a permission network. This places restrictions on who is allowed to participate in the network, and only in certain transactions. Participants need to obtain an invitation or permission to join.
Blockchain operates on technology stack described below.
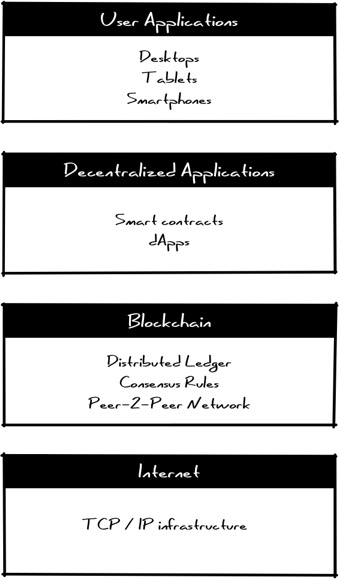
The blockchain protocol operates on top of internet stack through a peer-to-peer network of nodes. The stack is responsible for executing protocol, completing transactions based on a cryptographic consensus algorithm. The recorded transactions cannot be changed and can be inspected by anyone.
Decentralized applications (dApps) are applications that run on a P2P network of computers rather than a single computer. dApps are similar to a conventional web application. The front end uses the exact same technology to render the page. The one critical difference is that instead of an API connecting to a Database, you have a Smart Contract connecting to a blockchain. dApp enabled website: Front End → Smart Contract → Blockchain. As opposed to traditional, centralized applications, where the backend code is running on centralized servers, dApps have their backend code running on a decentralized P2P network. Customer interaction is done through user application layer. This is the consumer-facing part of the stack. These applications will work similar to current web or mobile applications but the main difference is they are built on decentralized protocols will be able to talk to each other.
Blockchain is a distributed and public ledger which maintains records of all transactions. A blockchain network is a truly peer-to-peer network and it does not require a trusted central authority intermediaries to authenticate or control the network infrastructure. With the blockchain’s ability to establish trust in a peer-to-peer network through a distributed consensus mechanism rather than relying on central authority. Blockchain has the potential to distrust not just the financial industry but also other industries including manufacturing, supply chain, logistics and healthcare.
There are two main parts in the Blockchain: the blockchain network, and the blockchain code. The blockchain network is the infrastructure where group of organizations to share data and processes together on a blockchain. The blockchain code runs on the blockchain network, and defines the organizations who can participate in the network. There are different categories of Blockchain including permissive (private), and public Blockchain models. A public blockchain network is completely open and anyone can join and participate in the network. The network typically has an incentivizing mechanism to encourage more participants to join the network. Bitcoin is one of the largest public blockchain networks in production today. A private blockchain network requires an invitation and must be validated by either the network starter or by a set of rules put in place by the network starter. Businesses who set up a private blockchain, will generally set up a permission network. This places restrictions on who is allowed to participate in the network, and only in certain transactions. Participants need to obtain an invitation or permission to join.
Blockchain operates on technology stack described below.
The blockchain protocol operates on top of internet stack through a peer-to-peer network of nodes. The stack is responsible for executing protocol, completing transactions based on a cryptographic consensus algorithm. The recorded transactions cannot be changed and can be inspected by anyone.
Decentralized applications (dApps) are applications that run on a P2P network of computers rather than a single computer. dApps are similar to a conventional web application. The front end uses the exact same technology to render the page. The one critical difference is that instead of an API connecting to a Database, you have a Smart Contract connecting to a blockchain. dApp enabled website: Front End → Smart Contract → Blockchain. As opposed to traditional, centralized applications, where the backend code is running on centralized servers, dApps have their backend code running on a decentralized P2P network. Customer interaction is done through user application layer. This is the consumer-facing part of the stack. These applications will work similar to current web or mobile applications but the main difference is they are built on decentralized protocols will be able to talk to each other.
Add sudo user in Ubuntu
15/06/17 18:48 Filed in: Devops
The sudo users are granted with administrator privileges to perform administrative tasks. This guide will show you the easiest way to create a new user with sudo access on Ubuntu, without having to modify your server's sudoers file. If you want to configure sudo for an existing user, simply skip to step 3.
Steps to Create a New Sudo User. Be sure to replace server and user name with your name.
Log in to your server as the root user.
$ssh root@SERVER
Use the adduser command to add a new user to your system.
$adduser username
Set and confirm the new user's password at the prompt. A strong password is highly recommended. Set password prompts:
$Enter new UNIX password:
$Retype new UNIX password:
$passwd: password updated successfully
Follow the prompts to set the new user's information. It is fine to accept the defaults to leave all of this information blank.
$Enter the new value, or press ENTER for the default
Full Name []:
Room Number []:
Work Phone []:
Home Phone []:
Other []:
Is the information correct? [Y/n]
Use the usermod command to add the user to the sudo group.
$usermod -aG sudo username
Test sudo access on new user account. Use the su command to switch to the new user account.
$su - username
As the new user, verify that you can use sudo by prepending "sudo" to the command that you want to run with superuser privileges.
$sudo command_to_run
For example, you can list the contents of the /root directory, which is normally only accessible to the root user.
$sudo ls -la /root
The first time you use sudo in a session, you will be prompted for the password of the user account. Enter the password to proceed.
Output:
[sudo] password for username:
If your user is in the proper group and you entered the password correctly, the command that you issued with sudo should run with root privileges.
Setting up Go development environment
02/03/17 21:39 Filed in: Programming | Golang
Go is fast growing programming language, so I thought it would be helpful to show how to setup and run Go programs on your machine. The instruction is for Mac OS X. Homebrew is required. If you don't have home-brew in your local environment, follow this link to setup home brew in your Mac development environment.
https://brew.sh/
$ brew install go
In order to run Go within your terminal, you’ll need to setup the GOPATH environment variable. This will allow Go to properly locate your workspace in order to run your code and manage your packages. I have my workspace "code" inside my home directory. ($HOME/code") and or Golang I have in $HOME/code/go. I'm using bash profile to setup GOPATH.
1. Edit ~/.bash_profile.
2. Add following lines to bash_profile
export GOPATH="$HOME/code/go"
export GOROOT=/usr/local/opt/go/libexec
export PATH=$PATH:$GOROOT/bin:$GOPATH/bin
3. I.e. source .bash_profile file or close and open terminal.
$ source ~/.bash_profile
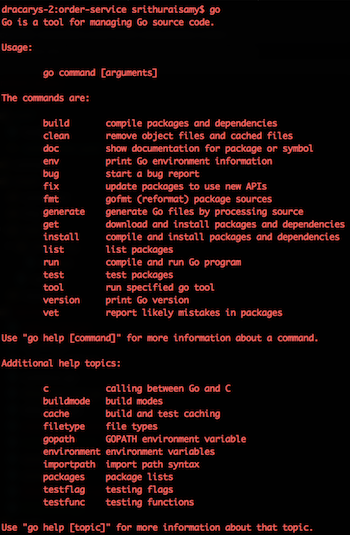
After the setup when you type go you should see as below.
https://brew.sh/
$ brew install go
In order to run Go within your terminal, you’ll need to setup the GOPATH environment variable. This will allow Go to properly locate your workspace in order to run your code and manage your packages. I have my workspace "code" inside my home directory. ($HOME/code") and or Golang I have in $HOME/code/go. I'm using bash profile to setup GOPATH.
1. Edit ~/.bash_profile.
2. Add following lines to bash_profile
export GOPATH="$HOME/code/go"
export GOROOT=/usr/local/opt/go/libexec
export PATH=$PATH:$GOROOT/bin:$GOPATH/bin
3. I.e. source .bash_profile file or close and open terminal.
$ source ~/.bash_profile
After the setup when you type go you should see as below.
Setup Docker in Ubuntu 14.04
10/09/14 16:51 Filed in: Cloud architecture | Docker
Overview
We are entering an age of open cloud infrastructure and application portability. The applications/services are required to scale in/out as per demand and need to be executed in multiple host environment. For this applications are required to run within shell, and the shell/container needs to work across several hosts and be portable to any cloud environment.
Docker is a container-based software framework for automating deployment of applications, makes it easy to partition a single host into multiple containers. However, although useful, many applications require resources beyond a single host, and real-world deployments require multiple hosts for resilience, fault tolerance and easy scaling of applications.
Installtion
These instructions describe to setup latest version of Docker for Ubuntu 14.04 for not latest release from Docker. Following are the list of commands.
To setup latest Docker release, add the Docker repository key to your local keychain and process the install commands
After install the Docker you can search any community containers. For e.g if you need to search for any debian package,
We are entering an age of open cloud infrastructure and application portability. The applications/services are required to scale in/out as per demand and need to be executed in multiple host environment. For this applications are required to run within shell, and the shell/container needs to work across several hosts and be portable to any cloud environment.
Docker is a container-based software framework for automating deployment of applications, makes it easy to partition a single host into multiple containers. However, although useful, many applications require resources beyond a single host, and real-world deployments require multiple hosts for resilience, fault tolerance and easy scaling of applications.
Installtion
These instructions describe to setup latest version of Docker for Ubuntu 14.04 for not latest release from Docker. Following are the list of commands.
- sudo apt-get update
- sudo apt-get install docker.io
- sudo ln -sf /usr/bin/docker.io /usr/local/bin/docker
- sudo sed -i '$acomplete -F _docker docker' /etc/bash_completion.d/docker.io
To setup latest Docker release, add the Docker repository key to your local keychain and process the install commands
- $ sudo apt-key adv --keyserver hkp://keyserver.ubuntu.com:80 --recv-keys 36A1D7869245C8950F966E92D8576A8BA88D21E9
- $ sudo sh -c "echo deb https://get.docker.io/ubuntu docker main > /etc/apt/sources.list.d/docker.list"
- $ sudo apt-get update
- $ sudo apt-get install lxc-docker
After install the Docker you can search any community containers. For e.g if you need to search for any debian package,
- docker search debian
Setup ActiveMQ, Zookeeper, and Replicated LevelDB running in JDK 8 and CentOS
22/08/14 11:53 Filed in: Data pipeline
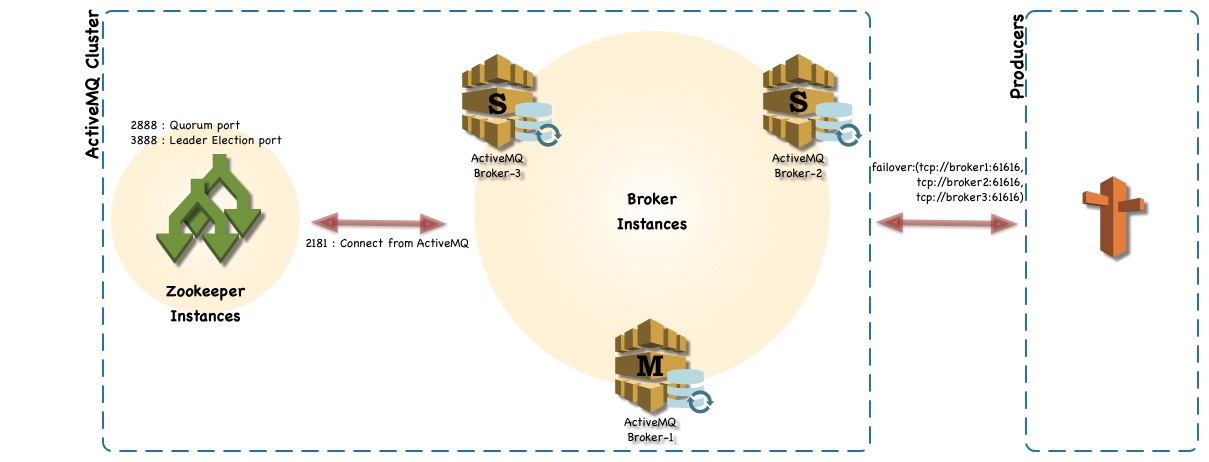
This guide describes the step-by-step guide to setup ActiveMQ to use replicated LevelDB persistence with Zookeeper. CentOS environment is used for servers. Zookeeper is used to replicate the LevelDB to support Master/Slave activeMQs. Three VMware instances are used with 2 Core processes, 2G RAM and 20G disk space. For simplicity, stop the IPtable service (firewall) in CentOS. If IPTable is required then you need to open set of ports. List of port numbers are included in pre-setup work section.
Overview
ActiveMQ cluster environment includes following
1 Three VM instances with CentOS os AND JDK 8
2 Three ActiveMQ instances.
3 Three Zookeeper instances.
Pre-install
Following ports are required to open in Iptables host firewall.
Installation
Java JDK
Zookeeper
Download activemq distribution from http://apache.mirror.nexicom.net/activemq/5.10.0/apache-activemq-5.10.0-bin.tar.gz
My approach was to get the software setup on a single VM instance in VM Ware fusion, and create two more clones to have three servers. I have named the instances as messageq1, messageq2, and messageq3. After starting instances confirm the myid file and IP address in the zoo.cfg are setup properly with new instance’s ip address.
After configured everything
No IOExceptionHandler registered, ignoring IO exception | org.apache.activemq.broker.BrokerService | LevelDB IOExcepti
on handler.
java.io.IOException: com.google.common.base.Objects.firstNonNull(Ljava/lang/Object;Ljava/lang/Object Ljava/lang/Object;
at org.apache.activemq.util.IOExceptionSupport.create(IOExceptionSupport.java:39)[activemq-client-5.10.0.jar:5.10.0]
at org.apache.activemq.leveldb.LevelDBClient.might_fail(LevelDBClient.scala:552)[activemq-leveldb-store-5.10.0.jar:5.10.0]
at org.apache.activemq.leveldb.LevelDBClient.replay_init(LevelDBClient.scala:657)[activemq-leveldb-store-5.10.0.jar:5.10.0]
at org.apache.activemq.leveldb.LevelDBClient.start(LevelDBClient.scala:558)[activemq-leveldb-store-5.10.0.jar:5.10.0]
at org.apache.activemq.leveldb.DBManager.start(DBManager.scala:648)[activemq-leveldb-store-5.10.0.jar:5.10.0]
at org.apache.activemq.leveldb.LevelDBStore.doStart(LevelDBStore.scala:235)[activemq-leveldb-store-5.10.0.jar:5.10.0]
at org.apache.activemq.leveldb.replicated.MasterLevelDBStore.doStart(MasterLevelDBStore.scala:110)[activemq-leveldb-store-5.10.0.jar:5.10.0]
at org.apache.activemq.util.ServiceSupport.start(ServiceSupport.java:55)[activemq-client-5.10.0.jar:5.10.0]
at org.apache.activemq.leveldb.replicated.ElectingLevelDBStore$$anonfun$start_master$1.apply$mcV$sp(ElectingLevelDBStore.scala:226)[activemq-lev
eldb-store-5.10.0.jar:5.10.0]
at org.fusesource.hawtdispatch.package$$anon$4.run(hawtdispatch.scala:330)[hawtdispatch-scala-2.11-1.21.jar:1.21]
at java.util.concurrent.ThreadPoolExecutor.runWorker(ThreadPoolExecutor.java:1142)[:1.8.0_20]
at java.util.concurrent.ThreadPoolExecutor$Worker.run(ThreadPoolExecutor.java:617)[:1.8.0_20]
After going through tickets in activeMQ found following ticket has been reported https://issues.apache.org/jira/browse/AMQ-5225. Workaround described in the ticket will solve the issue. The work around for this issue,
To confirm ActiveMQ listening for request
◦ In master, check with netstat -an | grep 61616 and confirm the port is in listen mode.
◦ In slaves, you can run netstat -an | grep 6161 and output should show you slave binding port 61619
Post-Install
◦ For Zookeeper, set the Java heap size. This is very important to avoid swapping, which will seriously degrade ZooKeeper performance. To determine the correct value, use load tests, and make sure you are well below the usage limit that would cause you to swap. Be conservative - use a maximum heap size of 3GB for a 4GB machine.
◦ Increase the open file number to support 51200. E.g: limit -n 51200.
◦ Review linux network setting parameters : http://www.nateware.com/linux-network-tuning-for-2013.html#.VA8pN2TCMxo
◦ Review ActiveMQ transports configuration settings : http://activemq.apache.org/configuring-transports.html
◦ Review ActiveMQ persistence configuration settings : http://activemq.apache.org/persistence.html
◦ Review zookeeper configuration settings : http://zookeeper.apache.org/doc/trunk/zookeeperAdmin.html#sc_configuration
Reference
◦ tickTime: the length of a single tick, which is the basic time unit used by ZooKeeper, as measured in milliseconds. It is used to regulate heartbeats, and timeouts. For example, the minimum session timeout will be two ticks.
◦ initLimit: Amount of time, in ticks , to allow followers to connect and sync to a leader. Increased this value as needed, if the amount of data managed by ZooKeeper is large.
◦ syncLimit: Amount of time, in ticks , to allow followers to sync with ZooKeeper. If followers fall too far behind a leader, they will be dropped.
◦ clientPort: The port to listen for client connections; that is, the port that clients attempt to connect to.
◦ dataDir: The location where ZooKeeper will store the in-memory database snapshots and, unless specified otherwise, the transaction log of updates to the database.
ActiveMQ configuration file from msgq1
xsi:schemaLocation="http://www.springframework.org/schema/beans http://www.springframework.org/schema/beans/spring-beans.xsd
http://activemq.apache.org/schema/core http://activemq.apache.org/schema/core/activemq-core.xsd">
file:${activemq.conf}/credentials.properties
directory=“~/Dev/server/activemq/data/leveldb"
hostname="192.168.163.160"/>
ZK Configuration file
tickTime=2000
initLimit=5
syncLimit=2
dataDir=/home/sthuraisamy/Dev/server/data/zk
clientPort=2181
server.1=192.168.163.160:2888:3888
server.2=192.168.163.161:2888:3888
server.3=192.168.163.162:2888:3888
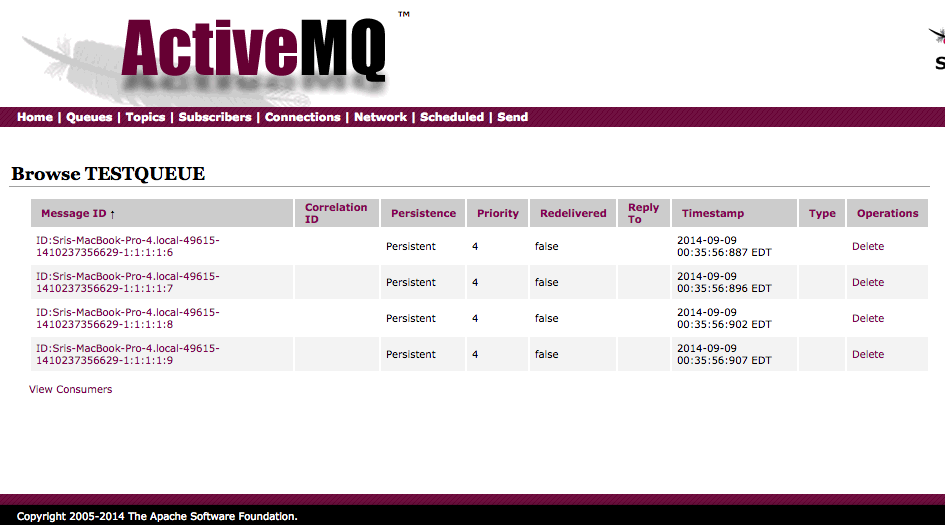
In ActiveMQ 5.10 web console you can view and delete the pending messages in a Queue
Overview
ActiveMQ cluster environment includes following
1 Three VM instances with CentOS os AND JDK 8
2 Three ActiveMQ instances.
3 Three Zookeeper instances.
Pre-install
Following ports are required to open in Iptables host firewall.
- Zookeeper
- 2181 – the port that clients will use to connect to the ZK ensemble
- 2888 – port used by ZK for quorum election
- 3888 – port used by ZK for leader election
- ActiveMQ
- 61616 – default Openwire port
- 8161 – Jetty port for web console
- 61619 – LevelDB peer-to-peer replication port for ActiveMQ slaves.
- To check Iptables status.
- service iptables status
- To stop iptables service
- service iptables save
- service iptables stop
- chkconfig iptables off
- To start again
- service iptables start
- chkconfig iptables on
- Setup proper hostname, edit following files
- Update HOSTNAME value in /etc/sysconfig/network : E.g: HOSTNAME=msgq1.dev.int
- Add host name with IP address of the machine in /etc/hosts: E.g: 192.168.163.160 msgq1.dev.int msgqa1
- Restart the instance and repeat same process each instances.
Installation
Java JDK
- Download JDK 8 from http://www.oracle.com/technetwork/java/javase/downloads/jdk8-downloads-2133151.html
- Extract JdK-8*.tar.gz to a folder of your choice (I used ~/Dev/server). This will create folder ~/Dev/server/jdk1.8.0_20.
- Set up JAVA_HOME directory.
- To setup for all users edit /etc/profile and add following line export JAVA_HOME=HOME_DIR/Dev/server/jdk1.8.0_20.
Zookeeper
- Download zookeeper from site http://zookeeper.apache.org/
- Extract the file into your folder of your choice. I have used ~/Dev/server/
- Create soft link zookeeper for extracted directory.
- For reliable ZooKeeper service, the ZK should be deployed in a cluster mode knows as ensemble. As long as a majority of the ensemble are up, the service will be available.
- Goto conf directory and create zookeeper configuration directory.
- cd
/conf - Copy zoo_sample.cfg to zoo.cfg
- Make sure the file has following lines
- tickTime=2000initLimit=5
syncLimit=2
dataDir=~/Dev/server/data/zk
clientPort=2181
- tickTime=2000initLimit=5
- Add following lines into zoo.cfg at the end.
- server.1=zk1_IPADDRESS:2888:3888
server.2=zk2_IPADDRESS:2888:3888
server.3=zk3_IPADDRESS:2888:3888
- server.1=zk1_IPADDRESS:2888:3888
- zk1, zk2 & zk3 are IP addresses for the ZK servers.
- Port 2181 is used to communicate with client
- Port 2888 is used by peer ZK servers to communicate among themselves (Quorum port)
- Port 3888 is used for leader election (Leader election port).
- The last three lines of the server.id=host:port:port format specifies that there are three nodes in the ensemble. In an ensemble, each ZooKeeper node must have a unique ID between 1 and 255. This ID is defined by creating a file named myid in the dataDir directory of each node. For example, the node with the ID 1 (server.1=zk1:2888:3888) will have a myid file at /home/sthuraisamy/Dev/server/data/zk with the text 1 inside it.
- Create myid file in data directory for zk1 ( server.1) and for other ZK servers as 2 & 3.
- echo 1 > myid
Download activemq distribution from http://apache.mirror.nexicom.net/activemq/5.10.0/apache-activemq-5.10.0-bin.tar.gz
- Extract the file into your folder of your choice. I have used ~/Dev/server/
- Create soft link activemq for extracted directory.
- Do following
- cd
/bin
- cd
- chmod 755 activemq
/bin/activemq start
- To confirm the activemq is listening on port 61616 or check the log file and confirm port listening messages are populated.
- netstat -an|grep 61616
- In activemq config file, following bean classes define the settings
- PropertyPlaceholderConfigurer
- Credentials
- Broker section
- constantPendingMessageLimitStrategy: limit the number of messages to be keep in memory for slow consumers.
- Other settings to handle slower consumers, refer http://activemq.apache.org/slow-consumer-handling.html
- Persistence adapter to define the storage to keep the messages.
- For better performance
- Use NIO : Refer http://activemq.apache.org/configuring-transports.html#ConfiguringTransports-TheNIOTransport
- Replicated LevelDB store using Zookeeper http://activemq.apache.org/replicated-leveldb-store.html
- The settings need to be done in ActiveMQ after zookeeper is setup. Add following lines into conf/activemq.xml
- hostname should be assigned with separate IP address for each instance.
My approach was to get the software setup on a single VM instance in VM Ware fusion, and create two more clones to have three servers. I have named the instances as messageq1, messageq2, and messageq3. After starting instances confirm the myid file and IP address in the zoo.cfg are setup properly with new instance’s ip address.
After configured everything
- Start the Zookeeper instances in all three nodes :
/bin/zk_Server.sh start - Start the activeMQ instances in all three nodes :
/bin/activemq start - In my setup when I start the first node I didn’t find any issue. After I have started the second node, I found exception in the log file.
No IOExceptionHandler registered, ignoring IO exception | org.apache.activemq.broker.BrokerService | LevelDB IOExcepti
on handler.
java.io.IOException: com.google.common.base.Objects.firstNonNull(Ljava/lang/Object;Ljava/lang/Object
at org.apache.activemq.util.IOExceptionSupport.create(IOExceptionSupport.java:39)[activemq-client-5.10.0.jar:5.10.0]
at org.apache.activemq.leveldb.LevelDBClient.might_fail(LevelDBClient.scala:552)[activemq-leveldb-store-5.10.0.jar:5.10.0]
at org.apache.activemq.leveldb.LevelDBClient.replay_init(LevelDBClient.scala:657)[activemq-leveldb-store-5.10.0.jar:5.10.0]
at org.apache.activemq.leveldb.LevelDBClient.start(LevelDBClient.scala:558)[activemq-leveldb-store-5.10.0.jar:5.10.0]
at org.apache.activemq.leveldb.DBManager.start(DBManager.scala:648)[activemq-leveldb-store-5.10.0.jar:5.10.0]
at org.apache.activemq.leveldb.LevelDBStore.doStart(LevelDBStore.scala:235)[activemq-leveldb-store-5.10.0.jar:5.10.0]
at org.apache.activemq.leveldb.replicated.MasterLevelDBStore.doStart(MasterLevelDBStore.scala:110)[activemq-leveldb-store-5.10.0.jar:5.10.0]
at org.apache.activemq.util.ServiceSupport.start(ServiceSupport.java:55)[activemq-client-5.10.0.jar:5.10.0]
at org.apache.activemq.leveldb.replicated.ElectingLevelDBStore$$anonfun$start_master$1.apply$mcV$sp(ElectingLevelDBStore.scala:226)[activemq-lev
eldb-store-5.10.0.jar:5.10.0]
at org.fusesource.hawtdispatch.package$$anon$4.run(hawtdispatch.scala:330)[hawtdispatch-scala-2.11-1.21.jar:1.21]
at java.util.concurrent.ThreadPoolExecutor.runWorker(ThreadPoolExecutor.java:1142)[:1.8.0_20]
at java.util.concurrent.ThreadPoolExecutor$Worker.run(ThreadPoolExecutor.java:617)[:1.8.0_20]
After going through tickets in activeMQ found following ticket has been reported https://issues.apache.org/jira/browse/AMQ-5225. Workaround described in the ticket will solve the issue. The work around for this issue,
- remove pax-url-aether-1.5.2.jar from lib directory
- comment out the log query section
To confirm ActiveMQ listening for request
◦ In master, check with netstat -an | grep 61616 and confirm the port is in listen mode.
◦ In slaves, you can run netstat -an | grep 6161 and output should show you slave binding port 61619
Post-Install
◦ For Zookeeper, set the Java heap size. This is very important to avoid swapping, which will seriously degrade ZooKeeper performance. To determine the correct value, use load tests, and make sure you are well below the usage limit that would cause you to swap. Be conservative - use a maximum heap size of 3GB for a 4GB machine.
◦ Increase the open file number to support 51200. E.g: limit -n 51200.
◦ Review linux network setting parameters : http://www.nateware.com/linux-network-tuning-for-2013.html#.VA8pN2TCMxo
◦ Review ActiveMQ transports configuration settings : http://activemq.apache.org/configuring-transports.html
◦ Review ActiveMQ persistence configuration settings : http://activemq.apache.org/persistence.html
◦ Review zookeeper configuration settings : http://zookeeper.apache.org/doc/trunk/zookeeperAdmin.html#sc_configuration
Reference
◦ tickTime: the length of a single tick, which is the basic time unit used by ZooKeeper, as measured in milliseconds. It is used to regulate heartbeats, and timeouts. For example, the minimum session timeout will be two ticks.
◦ initLimit: Amount of time, in ticks , to allow followers to connect and sync to a leader. Increased this value as needed, if the amount of data managed by ZooKeeper is large.
◦ syncLimit: Amount of time, in ticks , to allow followers to sync with ZooKeeper. If followers fall too far behind a leader, they will be dropped.
◦ clientPort: The port to listen for client connections; that is, the port that clients attempt to connect to.
◦ dataDir: The location where ZooKeeper will store the in-memory database snapshots and, unless specified otherwise, the transaction log of updates to the database.
ActiveMQ configuration file from msgq1
xsi:schemaLocation="http://www.springframework.org/schema/beans http://www.springframework.org/schema/beans/spring-beans.xsd
http://activemq.apache.org/schema/core http://activemq.apache.org/schema/core/activemq-core.xsd">
directory=“~/Dev/server/activemq/data/leveldb"
hostname="192.168.163.160"/>
ZK Configuration file
tickTime=2000
initLimit=5
syncLimit=2
dataDir=/home/sthuraisamy/Dev/server/data/zk
clientPort=2181
server.1=192.168.163.160:2888:3888
server.2=192.168.163.161:2888:3888
server.3=192.168.163.162:2888:3888
In ActiveMQ 5.10 web console you can view and delete the pending messages in a Queue
Streaming Data
21/08/14 00:49 Filed in: Data pipeline
BigData is a collection of data set so large and complex that it becomes difficult to process using on-hand database management tools or traditional applications. The datasets not only contain structured datasets, but also include unstructured datasets. Big data has three characteristics:
The diagram explains the characteristics.
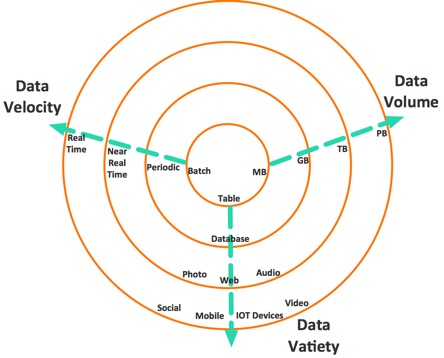
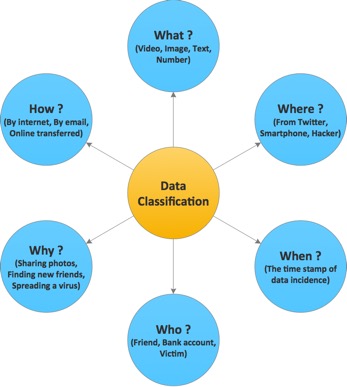
Recently, more and more is getting easily available as streams. The stream data item can be classified into 5Ws data dimensions.
Conventional data processing technologies are now unable to process these kind of volume data within a tolerable elapsed time. In-memory databases also have certain key problems such as larger data size may not fit into memory, moving all data sets into centralized machine is too expensive. To process data as they arrive, the paradigm has changed from the conventional “one-shot” data processing approach to elastic and virtualized datacenter cloud-based data processing frameworks that can mine continuos, high-volume, open-ended data streams.
The framework contains three main components.
Following diagram explain these components.
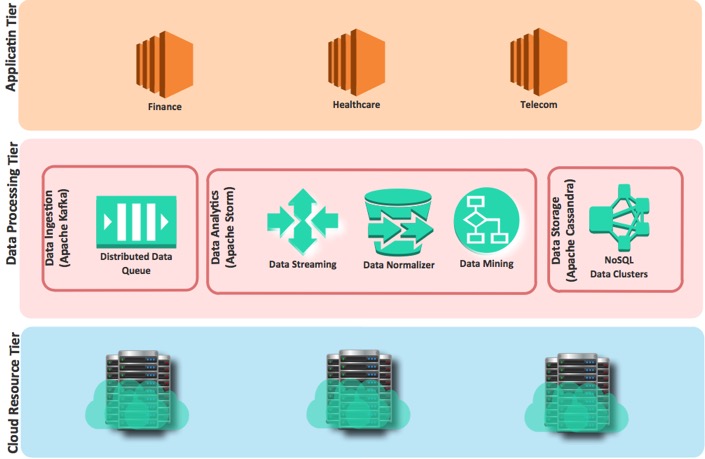
- Volume
- Velocity.
- Variety.
The diagram explains the characteristics.
Recently, more and more is getting easily available as streams. The stream data item can be classified into 5Ws data dimensions.
- What the data is? Video, Image, Text, Number
- Where the data came from? From twitter, Smart phone, Hacker
- When the data occurred? The timestamp of data incidence.
- Who received the data? Friend, Bank account, victim
- Why the data occurred? Sharing photos, Finding new friends, Spreading a virus
- How the data was transferred? By Internet, By email, Online transferred
Conventional data processing technologies are now unable to process these kind of volume data within a tolerable elapsed time. In-memory databases also have certain key problems such as larger data size may not fit into memory, moving all data sets into centralized machine is too expensive. To process data as they arrive, the paradigm has changed from the conventional “one-shot” data processing approach to elastic and virtualized datacenter cloud-based data processing frameworks that can mine continuos, high-volume, open-ended data streams.
The framework contains three main components.
- Data Ingestion: Accepts the data from multiple sources such as social networks, online services, etc.
- Data Analytics: Consist many systems to read, analyze, clean and normalize.
- Data Storage: Provide to store and index data sets.
Following diagram explain these components.
PCI DSS 3.0
31/07/14 15:12 Filed in: Security
The Payment Card Industry Data Security Standard (PCI DSS) was developed by following payment entities.
PCI DSS mandates set of requirements and processes for security management, policies, procedures, network architecture, software design and critical protective measures. The requirement must be met by all organizations (merchants and service providers) that transmit, process or store payment card data, or directly or indirectly affect the security of cardholder data. If an organization uses a third party to manage cardholder data, the organization has a responsibility to ensure that this third party is compliant with the PCI DSS. The requirements are published and controlled by the independent PCI Security Standards Council (SSC) defines qualifications for Qualified Security Assessors (QSAs), Internal Security Assessors (ISA), PCI Forensic Investigators (PFI), PCI Professionals (PCIP), Qualified Integrators and Resellers (QIR), and Approved Scanning Vendors (ASVs). It trains,
Key definitions2 and acronyms in the PCI DSS:
PCI DSS applies to all processes, people and technology, and all system components, including network components, servers, or applications that are included in or connected to the cardholder data environment. It also applies to telephone recording technology used by call centres that accept payment card transactions.
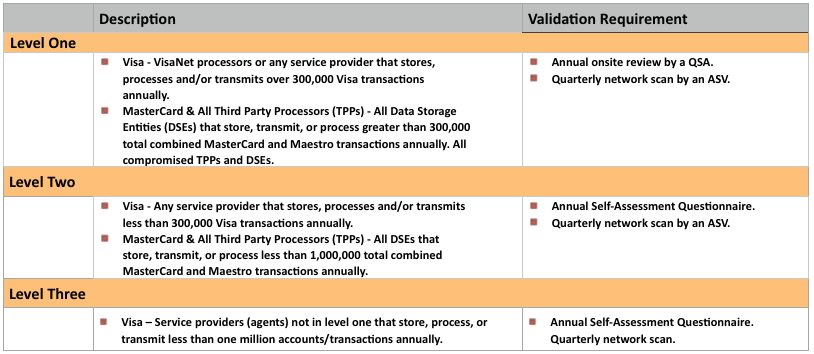
Service provider compliance levels are described in below table:
PCI DSS Procedures
Install and maintain a firewall configuration to protect cardholder data
Do not use vendor-supplied defaults for system passwords and other security parameters
Protect stored cardholder data
Encrypt transmission of cardholder data across open, public networks
Protect all systems against malware and regularly update anti-virus software or programs
Develop and maintain secure systems and applications
Restrict access to cardholder data by business need-to-know
Identify and authenticate access to system components
Restrict physical access to cardholder data
Track and monitor all access to network resources and cardholder data
Regularly test security systems and processes
Maintain a policy that addresses information security for all personnel
- American Express
- Discover Financial Services
- JCB International
- MasterCard Worldwide
- Visa.
PCI DSS mandates set of requirements and processes for security management, policies, procedures, network architecture, software design and critical protective measures. The requirement must be met by all organizations (merchants and service providers) that transmit, process or store payment card data, or directly or indirectly affect the security of cardholder data. If an organization uses a third party to manage cardholder data, the organization has a responsibility to ensure that this third party is compliant with the PCI DSS. The requirements are published and controlled by the independent PCI Security Standards Council (SSC) defines qualifications for Qualified Security Assessors (QSAs), Internal Security Assessors (ISA), PCI Forensic Investigators (PFI), PCI Professionals (PCIP), Qualified Integrators and Resellers (QIR), and Approved Scanning Vendors (ASVs). It trains,
Key definitions2 and acronyms in the PCI DSS:
- Acquirer: Bank, which acquires merchants.
- Payment brand: Visa, MasterCard, Amex, Discover, JCB.
- Merchant: Sells products to cardholders.
- Service provider: A business entity, directly or indirectly involved in the processing, storage, transmission and switching of cardholder data.
- PAN (Primary Account Number): The 16 digit payment card number.
- TPPs (Third Party Processors): Who process payment card transactions.
- DSEs (Data Storage Entities): Who store or transmit payment card data.
- QSA (Qualified Security Assessor): Someone who is trained and certified to carry out PCI DSS compliance assessments.
- ISA (Internal Security Assessor): Someone who is trained and certified to conduct internal security assessments.
- ASV (Approved Scanning Vendor): An organization that is approved as competent to carry out the security scans required by PCI DSS.
- PFI (PCI Forensic Investigator): An individual trained and certified to investigate and contain information security breaches involving cardholder data.
- CDE (Cardholder Data Environment): Any network that possesses cardholder data or sensitive authentication data.
PCI DSS applies to all processes, people and technology, and all system components, including network components, servers, or applications that are included in or connected to the cardholder data environment. It also applies to telephone recording technology used by call centres that accept payment card transactions.
Service provider compliance levels are described in below table:
PCI DSS Procedures
Install and maintain a firewall configuration to protect cardholder data
- Establish and implement firewall and router configuration standards.
- Build firewall and router configurations that restrict connections between untrusted networks and any system components in the cardholder data environment.
- Prohibit direct public access between the Internet and any system component in the cardholder data environment.
- Install personal firewall software on any mobile and/or employee-owned devices that connect to the Internet when outside the network.
- Ensure that security policies and operational procedures for managing firewalls are documented, in use, and known to all affected parties.
- Maintain current network and data flow diagrams.
Do not use vendor-supplied defaults for system passwords and other security parameters
- Always change vendor-supplied defaults and remove or disable unnecessary default accounts before installing a system on the network.
- Develop configuration standards for all system components. Ensure that these standards address all known security vulnerabilities and are consistent with industry-accepted system hardening standards.
- Encrypt all non-console administrative access using strong cryptography. Use technologies such as SSH, VPN, or SSL/TLS for web-based management and other non-console administrative access.
- Maintain an inventory of system components that are in scope for PCI DSS.
- Ensure that security policies and operational procedures for managing vendor defaults and other security parameters are documented, in use, and known to all affected parties.
- Shared hosting providers must protect each entity’s hosted environment and cardholder data.
Protect stored cardholder data
- Keep cardholder data storage to a minimum by implementing data retention and disposal policies, procedures and processes.
- Do not store sensitive authentication data after authorization (even if encrypted). If sensitive authentication data is received, render all data unrecoverable upon completion of the authorization process.
- Mask PAN when displayed (the first six and last four digits, at maximum), such that only personnel with a legitimate business need can see the full PAN.
- Render PAN unreadable anywhere it is stored (including on portable digital media, backup media, and in logs).
- Document and implement procedures to protect keys used to secure stored cardholder data against disclosure and misuse.
- Fully document and implement all key-management processes and procedures for cryptographic keys used for encryption of cardholder data.
- Ensure that security policies and operational procedures for protecting stored cardholder data are documented, in use, and known to all affected parties.
Encrypt transmission of cardholder data across open, public networks
- Use strong cryptography and security protocols (for example, SSL/TLS, IPSEC, SSH, etc.) to safeguard sensitive cardholder data during transmission over open, public networks.
- Never send unprotected PANs by end-user messaging technologies (for example, e-mail, instant messaging, chat etc.).
- Ensure that security policies and operational procedures for encrypting transmissions of cardholder data are documented, in use, and known to all affected parties.
Protect all systems against malware and regularly update anti-virus software or programs
- Ensure that all anti-virus mechanisms are maintained.
- Ensure that anti-virus mechanisms are actively running and cannot be disabled or altered by users, unless specifically authorized by management on a case-by-case basis for a limited time period.
- Ensure that security policies and operational procedures for protecting systems against malware are documented, in use, and known to all affected parties.
Develop and maintain secure systems and applications
- Establish a process to identify security vulnerabilities, using reputable outside sources for security vulnerability information, and assign a risk ranking.
- Ensure that all system components and software are protected from known vulnerabilities by installing applicable vendor-supplied security patches. Install critical security patches within one month of release.
- Develop internal and external software applications securely (including web-based administrative access to applications).
- Follow change control processes and procedures for all changes to system components.
- Address common coding vulnerabilities in software development processes.
- For public-facing web applications, address new threats and vulnerabilities on an ongoing basis and ensure these applications are protected against known attacks.
- Ensure that security policies and operational procedures for developing and maintaining secure systems and applications are documented, in use, and known to all affected parties.
Restrict access to cardholder data by business need-to-know
- Limit access to system components and cardholder data to only those individuals whose job requires such access.
- Establish an access control system for systems components that restricts access based on a user’s need to know, and is set to “deny all” unless specifically allowed.
- Ensure that security policies and operational procedures for restricting access to cardholder data are documented, in use, and known to all affected parties.
Identify and authenticate access to system components
- Define and implement policies and procedures to ensure proper user identification management for non-consumer users and administrators on all system components.
- In addition to assigning a unique ID, ensure proper user-authentication management for non-consumer users and administrators on all system components.
- Incorporate two-factor authentication for remote network access originating from outside the network by personnel (including users and administrators) and all third parties, (including vendor access for support or maintenance).
- Document and communicate authentication procedures and policies.
- Do not use group, shared or generic IDs, passwords, or other authentication methods.
- Where other authentication mechanisms are used (for example, physical or logical security tokens, smart cards, certificates etc.), use of these mechanisms must be assigned to an individual account and only the intended account can use that mechanism.
- All access to any database containing cardholder data (including access by applications, administrators, and all other users) is restricted.
- Ensure that security policies and operational procedures for identification and authentication are documented, in use, and known to all affected parties.
Restrict physical access to cardholder data
- Use appropriate facility entry controls to limit and monitor physical access to systems in the cardholder data environment.
- Develop procedures to easily distinguish between onsite personnel and visitors.
- Control physical access for onsite personnel to the sensitive areas.
- Implement procedures to identify and authorize visitors.
- Physically secure all media.
- Maintain strict control over the internal or external distribution of any kind of media
- Maintain strict control over the storage and accessibility of media.
- Destroy media when it is no longer needed for business or legal reasons.
- Protect devices that capture payment card data via direct physical interaction with the card from tampering and substitution.
Track and monitor all access to network resources and cardholder data
- Implement audit trails to link all access to system components to each individual user.
- Implement automated audit trails for all system components to reconstruct events,
- create an audit trail for all system components for each event,
- Using time-synchronization technology, synchronize all critical system clocks and times and ensure that the following is implemented for acquiring, distributing and storing time.
- Secure audit trails so they cannot be altered.
- Review logs and security events for all system components to identify anomalies or suspicious activity.
- Retain audit trail history for at least one year, with a minimum of three months immediately available for analysis.
- Ensure that security policies and operational procedures for monitoring all access to network resources and cardholder data are documented, in use, and known to all affected parties.
Regularly test security systems and processes
- Implement processes to test for the presence of wireless access points (802.11), and detect and identify all authorized and unauthorized wireless access points on a quarterly basis.
- Run internal and external network vulnerability scans at least quarterly and after any significant change in the network.
- Implement a methodology for penetration testing.
- Use intrusion-detection and/or intrusion-prevention techniques to detect and/or prevent intrusions into the network.
- Deploy a change-detection mechanism to alert personnel to unauthorized modification of critical system files, configuration files, or content files; and configure the software to perform critical file comparisons at least weekly.
- Ensure that security policies and operational procedures for security monitoring and testing are documented, in use, and known to all affected parties.
Maintain a policy that addresses information security for all personnel
- Establish, publish, maintain and disseminate a security policy.
- Implement a risk assessment process.
- Develop usage policies for critical technologies and define proper use of these technologies.
- Ensure that the security policy and procedures clearly define information security responsibilities for all personnel.
- Assign to an individual or team information security management responsibilities.
- Implement a formal security awareness programme to make all personnel aware of the importance of cardholder data security.
- Screen potential personnel prior to hire to minimize the risk of attacks from internal sources.
- Maintain and implement policies and procedures to manage service providers with whom cardholder data is shared, or that could affect the security of cardholder data.
- Additional requirement for service providers: Service providers acknowledge in writing to customers that they are responsible for the security of cardholder data the service provider possesses or otherwise stores, processes or transmits on behalf of the customer, or to the extent that they could impact the security of the customer’s cardholder data environment.
- Implement an incident response plan. Be prepared to respond immediately to a system breach.
Reliability design for Cloud applications
23/07/14 17:26 Filed in: Cloud architecture
On of the backbones of the software reliability is avoiding the faults. In software reliability engineering, there are four major approaches to improve system reliability.
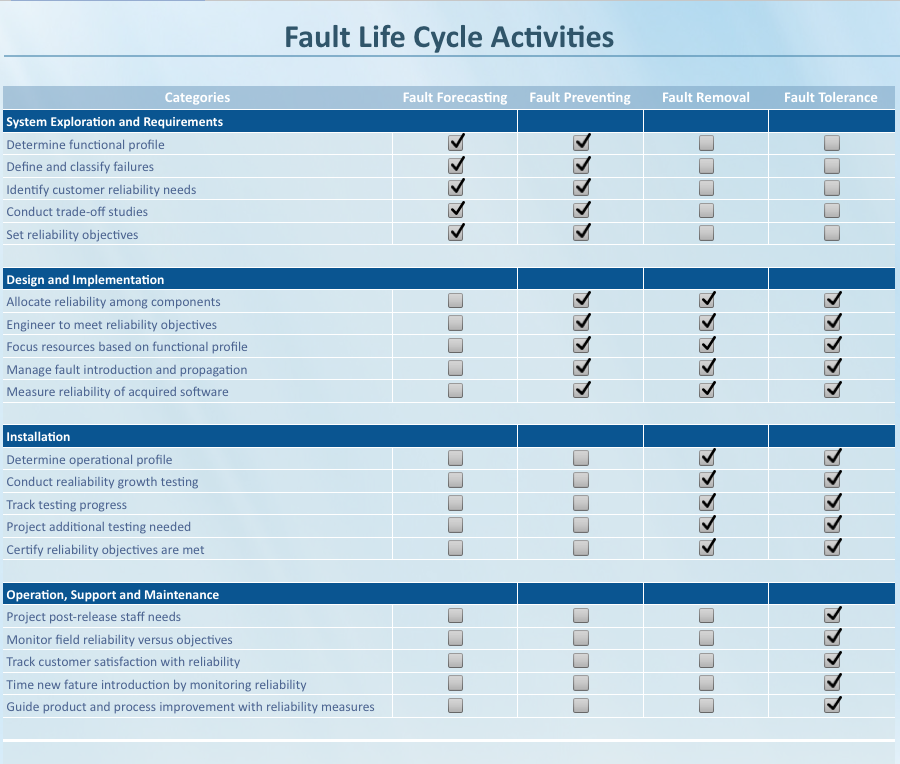
When changing to the cloud environment, the applications deployed in the cloud are usually distributed into multiple components, only having fault prevention and fault removal techniques are not sufficient. Another approach for building reliable systems is software fault tolerance, which is to employ functionally equivalent components to tolerate faults. Software fault tolerance approach takes advantage of the redundant resources in the cloud environment, and makes the system more robust by masking faults instead of removing them.
Cloud computing platforms typically prefer to build reliability into the software. The software should be designed for failure and assumes that components will misbehave/fail or go away from time to time. Reliability should be built into application and as well as data. I.e. within the component or external module should monitor the service components and provide/execute recovery process. Multiple copies of data are maintained such that if you lose any individual machine the system continues to function (in the same way that if you lose a disk in a RAID array the service is uninterrupted). Large scale services will ideally also replicate data in multiple locations, such that if a rack, row of racks or even an entire datacenter were to fail then the service would still be uninterrupted
- Fault Forecasting: Provides the predictive approach to software reliability engineering. Measures of the forecasted dependability, can be obtained by modelling or using the experience from previously deployed systems. Forecasting is a front-end product development life cycle exercise. It is done during system exploration and requirements definition. Fault prevention: Aims to prevent the introduction of faults, e.g., by constraining the design processes by means of rules. Prevention occurs during the product development phases of a project where the requirements, design, and implementation are occurring.
- Fault removal: Aims to detect the presence of faults, and then to locate and remove them. Fault removal begins at the first opportunity that faults injected into the product are discovered. At the design phase, requirements phase products are passed to the design team. This is the first opportunity to discover faults in the requirements models and specifications. Fault removal extends into implementation and through installation.
- Fault tolerance: Provides the intrinsic ability of a software system to continuously deliver service to its users in the presence of faults. This approach to software reliability addresses how to keep a system functioning after the faults in the delivered system manifest themselves. Fault tolerance relies primarily on error detection and error correction, with the latter being either backward recovery (e.g., retry), forward recovery (e.g., exception handling) or compensation recovery (e.g., majority voting). From the middle phases of the software development life cycle through product delivery and maintenance, reliability efforts focus on fault tolerance.
When changing to the cloud environment, the applications deployed in the cloud are usually distributed into multiple components, only having fault prevention and fault removal techniques are not sufficient. Another approach for building reliable systems is software fault tolerance, which is to employ functionally equivalent components to tolerate faults. Software fault tolerance approach takes advantage of the redundant resources in the cloud environment, and makes the system more robust by masking faults instead of removing them.
Cloud computing platforms typically prefer to build reliability into the software. The software should be designed for failure and assumes that components will misbehave/fail or go away from time to time. Reliability should be built into application and as well as data. I.e. within the component or external module should monitor the service components and provide/execute recovery process. Multiple copies of data are maintained such that if you lose any individual machine the system continues to function (in the same way that if you lose a disk in a RAID array the service is uninterrupted). Large scale services will ideally also replicate data in multiple locations, such that if a rack, row of racks or even an entire datacenter were to fail then the service would still be uninterrupted
ActiveMQ HA Tunning
15/07/14 22:52 Filed in: Data pipeline
Performance is based on following factors
The possible bottlenecks are
Async publishing
When an ActiveMQ message producer sends a non-persistent message, its dispatched asynchronously (fire and forget) - but for persistent messages, the publisher will block until it gets a notification that the message has been processed (saved to the store - queued to be dispatched to any active consumers etc) by the broker. messages are dispatched with delivery mode set to be persistent by default (which is required by the JMS spec). So if you are sending messages on a Topic, the publisher will block by default (even if there are no durable subscribers on the topic) until the broker has returned a notification. So if you looking for good performance with topic messages, either set the delivery mode on the publisher to be non-persistent, or set the useAsyncSend property on the ActiveMQ ConnectionFactory to be true.
Pre-fetch sizes for Consumer
ActiveMQ will push as many messages to the consumer as fast as possible, where they will be queued for processing by an ActiveMQ Session. The maximum number of messages that ActiveMQ will push to a Consumer without the Consumer processing a message is set by the pre-fetch size. You can improve throughput by running ActiveMQ with larger pre-fetch sizes. Pre-fetch sizes are determined by the ActiveMQPrefetchPolicy bean, which is set on the ActiveMQ ConnectionFactory.
queue -> 1000
queue browser -> 500
topic -> 32767
durable topic -> 1000
Optimized acknowledge
When consuming messages in auto acknowledge mode (set when creating the consumers' session), ActiveMQ can acknowledge receipt of messages back to the broker in batches (to improve performance). The batch size is 65% of the prefetch limit for the Consumer. Also if message consumption is slow the batch will be sent every 300ms. You switch batch acknowledgment on by setting the optimizeAcknowledge property on the ActiveMQ ConnectionFactory to be true
Straight through session consumption
By default, a Consumer's session will dispatch messages to the consumer in a separate thread. If you are using Consumers with auto acknowledge, you can increase throughput by passing messages straight through the Session to the Consumer by setting the alwaysSessionAsync property on the ActiveMQ ConnectionFactory to be false
File based persistence
file based persistence store that can be used to increase throughput for the persistent messages
Performance test tools
- The network topology
- Transport protocols used
- Quality of service
- Hardware, network, JVM and operating system
- Number of producers, number of consumers
- Distribution of messages across destinations along with message size
The possible bottlenecks are
- Overall system
- Network latencies
- Disk IO
- Threading overheads
- JVM optimizations
Async publishing
When an ActiveMQ message producer sends a non-persistent message, its dispatched asynchronously (fire and forget) - but for persistent messages, the publisher will block until it gets a notification that the message has been processed (saved to the store - queued to be dispatched to any active consumers etc) by the broker. messages are dispatched with delivery mode set to be persistent by default (which is required by the JMS spec). So if you are sending messages on a Topic, the publisher will block by default (even if there are no durable subscribers on the topic) until the broker has returned a notification. So if you looking for good performance with topic messages, either set the delivery mode on the publisher to be non-persistent, or set the useAsyncSend property on the ActiveMQ ConnectionFactory to be true.
Pre-fetch sizes for Consumer
ActiveMQ will push as many messages to the consumer as fast as possible, where they will be queued for processing by an ActiveMQ Session. The maximum number of messages that ActiveMQ will push to a Consumer without the Consumer processing a message is set by the pre-fetch size. You can improve throughput by running ActiveMQ with larger pre-fetch sizes. Pre-fetch sizes are determined by the ActiveMQPrefetchPolicy bean, which is set on the ActiveMQ ConnectionFactory.
queue -> 1000
queue browser -> 500
topic -> 32767
durable topic -> 1000
Optimized acknowledge
When consuming messages in auto acknowledge mode (set when creating the consumers' session), ActiveMQ can acknowledge receipt of messages back to the broker in batches (to improve performance). The batch size is 65% of the prefetch limit for the Consumer. Also if message consumption is slow the batch will be sent every 300ms. You switch batch acknowledgment on by setting the optimizeAcknowledge property on the ActiveMQ ConnectionFactory to be true
Straight through session consumption
By default, a Consumer's session will dispatch messages to the consumer in a separate thread. If you are using Consumers with auto acknowledge, you can increase throughput by passing messages straight through the Session to the Consumer by setting the alwaysSessionAsync property on the ActiveMQ ConnectionFactory to be false
File based persistence
file based persistence store that can be used to increase throughput for the persistent messages
Performance test tools
- http://activemq.apache.org/activemq-performance-module-users-manual.html
- http://activemq.apache.org/jmeter-performance-tests.html
Kafka Design
05/07/14 01:20 Filed in: Data pipeline
Existing messaging systems have too much complexity created the limitations in performance, scaling and managing. To overcome this issue, LinkedIn (www.linkedin.com) decided to build Kafka to address their need for monitoring activity stream data and operational metrics such as CPU, I/O usage, and request timings.
While developing Kafka, the main focus was to provide the following
In a very basic structure, a producer publishes messages to a Kafka topic, which is created on a Kafka broker acting as a Kafka server. Consumers then subscribe to the Kafka topic to get the messages.
Important Kafka design facts are as follows:
The above notes are taken from “Apache Kafka” Book.
While developing Kafka, the main focus was to provide the following
- An API for producers and consumers to support custom implementation
- Low overhead for network and storage with message persistence
- High throughput supporting millions of messages
- Distributed and highly scalable architecture
In a very basic structure, a producer publishes messages to a Kafka topic, which is created on a Kafka broker acting as a Kafka server. Consumers then subscribe to the Kafka topic to get the messages.
Important Kafka design facts are as follows:
- The fundamental backbone of Kafka is message caching and storing it on the filesystem. In Kafka, data is immediately written to the OS kernel page. Caching and flushing of data to the disk is configurable.
- Kafka provides longer retention of messages ever after consumption, allowing consumers to re-consume, if required.
- Kafka uses a message set to group messages to allow lesser network overhead.
- Unlike most of the messaging systems, where metadata of the consumed messages are kept at server level, in Kafka, the state of the consumed messages is maintained at consumer level. This also addresses issues such as:
- Loosing messages due to failure
- Multiple deliveries of the same message
- By default, consumers store the state in ZooKeeper, but Kafka also allows storing it within other storage systems used for Online Transaction Processing (OLTP) applications as well.
- In Kafka, producers and consumers work on the traditional push-and-pull model, where producers push the message to a Kafka broker and consumers pull the message from the broker.
- Kafka does not have any concept of a master and treats all the brokers as peers. This approach facilitates addition and removal of a Kafka broker at any point, as the metadata of brokers are maintained in ZooKeeper and shared with producers and consumers.
- In Kafka 0.7.x, ZooKeeper-based load balancing allows producers to discover the broker dynamically. A producer maintains a pool of broker connections, and constantly updates it using ZooKeeper watcher callbacks. But in Kafka 0.8.x, load balancing is achieved through Kafka metadata API and ZooKeeper can only be used to identify the list of available brokers.
- Producers also have an option to choose between asynchronous or synchronous mode for sending messages to a broker.
The above notes are taken from “Apache Kafka” Book.
Load balancer in scalable architecture
29/06/14 15:34 Filed in: Cloud architecture
In any SaaS or web application, incoming traffic from end-user, normally hit a load balancer as the first tier. The role load balancer is to balance the load of the request to next lower tier. There are two types of load balancers such as software-base or hardware based. Most load balancers provide different rules for distributing the load. Following are two of the most common options available.
- Round Robin: With round robin routing, the load balancer distributes inbound requests one at a time to an application server for processing, one after another. Provided that most requests can be serviced in an approximately even amount of time, this method results in a relatively well-balanced distribution of work across the available cluster of application servers.The drawback of this approach is that each individual transaction or request, even if it is from the same user session, will potentially go to a different application server for processing.
- Sticky Routing: When a load balancer implements sticky routing, the intent is to process all transactions or requests for a given user session by the same application server. In other words, when a user logs in, an application server is selected for processing by the load balancer. All subsequent requests for that user are then routed to the original application server for processing. This allows the application to retain session state in the application server, that is, information about the user and their actions as they continue to work in their session.Sticky routing is very useful in some scenarios, for example tracking a secure connection for the user without the need of authenticating repeatedly with each individual request (potentially a very expensive operation). The session state can also yield a better experience for the end user, by utilizing the session history of actions or other information about the user to tailor application responses.Given that the load balancer normally stores only information about the user connection and the assigned application server for the connection, sticky routing still meets the definition of a stateless component.
Cloud Modernization Process - Mistakes could be
27/06/14 00:45 Filed in: Cloud architecture
Integrating legacy systems with cloud-based applications is a complex matter with ample room for error. The most frequent, overpriced, poorly functioning and even damaging mistakes businesses make include:
Mistake #1. Replacing the whole system:
Some enterprises choose to avoid the challenges of integration by creating a new system that replaces the full functionality of the old one. This is the most costly, difficult, and risk-prone option, but it does offer a long-term solution and may provide a system that is sufficiently agile to respond to changing business needs. Despite that potential pay-off, complete replacement requires a large, up-front investment for development, poses difficulties in duplicating behaviour of the legacy system, and increases the risk of complete software project failure.
Mistake #2. Wrapping existing legacy applications:
Often, organizations decide to wrap their legacy assets in shiny, more modern interfaces. These interfaces allow the use of a more flexible service-orientated architecture (SOA) approach, but they do not actually help make the system more flexible or easier to maintain. Certainly, wrapping allows increased access to the legacy system by other systems and the potential to replace individual parts on a piecemeal basis.
Although wrapping presents a modest up-front cost and relatively low risk, it fails to solve the core problem of legacy systems; enterprises still need to maintain outdated assets and still suffer from a lack of agility. To make matters worse, the look and feel of the wrappers are rarely elegant and quickly become dated themselves.
Mistake #3. Giving up and living with what you have:
Integration is difficult, and perhaps it shouldn’t be surprising that so many IT leaders go down this road. Despite the appearance of avoiding risk by avoiding change, giving up does not offer any hope of alleviating the legacy problem and provides only stagnation. Living with what you have frees you from up-front costs, but it denies you the ability to reduce maintenance expenses, increase operational efficiencies, or increase business agility that could boost your enterprise’s competitive advantage.
Mistake #4. Having the IT team create the utilities necessary to link individual applications:
This scenario occurs frequently but generally for a short time. Enterprises quickly discover that manually writing interfaces to accommodate obsolete platforms and programming languages is resource-intensive and prone to error.
Mistake #5: Implementing highly complex middleware solutions:
When considering a cloud integration platform, be sure there are not too many moving parts. If the middleware platform itself is so complex that you have to choose from among dozens of different products and then integrate the middleware to itself first before you can even begin to integrate your legacy applications to the cloud, you have a problem.If middleware requires the use of one or more programming or scripting language, you have another problem. A unified integration platform will simplify legacy application integration with the cloud.
Hadoop Platform Architecture
27/05/14 00:21 Filed in: Data pipeline | NoSQL
Hadoop platform contains following major modules
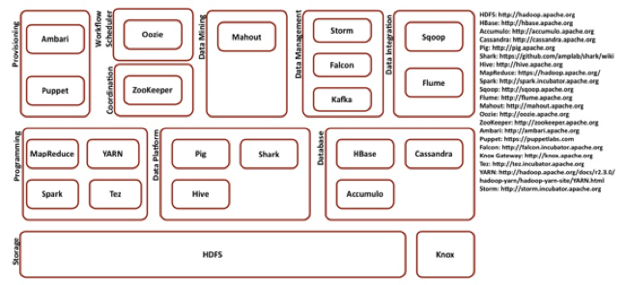
- Storage
- Programming
- Data Platform
- Database
- Provisioning
- Coordination
- Workflow Scheduler
- Data Mining
- Data Integration
Log Management with Flume
18/04/14 00:36 Filed in: Data pipeline
- Flume is a distributed, reliable, and available service for efficiently collecting, aggregating, and moving large amounts of log data. It has a simple and flexible architecture based on streaming data flows. It is robust and fault tolerant with tunnable reliability mechanisms and many failover and recovery mechanisms. The system is centrally managed and allows for intelligent dynamic management. It uses a simple extensible data model that allows for online analytic applications.
- Flume allows you to configure your Flume installation from a central point, without having to ssh into every machine, update a configuration variable and restart a daemon or two. You can start, stop, create, delete and reconfigure logical nodes on any machine running Flume from any command line in your network with the Flume jar available.
- Flume also has centralized liveness monitoring. We've heard a couple of stories of Scribe processes silently failing, but lying undiscovered for days until the rest of the Scribe installation starts creaking under the increased load. Flume allows you to see the health of all your logical nodes in one place (note that this is different from machine liveness monitoring; often the machine stays up while the process might fail).
- Flume supports three distinct types of reliability guarantees, allowing you to make tradeoffs between resource usage and reliability. In particular, Flume supports fully ACKed reliability, with the guarantee that all events will eventually make their way through the event flow.
- Flume's also really extensible - it's really easy to write your own source or sink and integrate most any system with Flume. If rolling your own is impractical, it's often very straightforward to have your applications output events in a form that Flume can understand (Flume can run Unix processes, for example, so if you can use shell script to get at your data, you're golden).
Enabling two-factor authentication for cloud applications
06/03/14 23:48 Filed in: Security | Cloud architecture
Two-factor authentication provide more security to make sure your accounts don't get hacked. Passwords, unfortunately, aren't as secure as they used to be. Having strong password may not help also. Humans are the weakest link and string password can be compromised. Two-factor authentication solves this problem and this is a simple feature that asks for more than just your password. It requires both "something you know" (like a password) and "something you have" (like your phone). After you enter your password, you'll get a second code sent to your phone, and only after you enter it will you get into your account. Currently, a lot of sites have recently implemented it, including many of social sites, business applications, etc. Here are some services that support two-factor authentication.
There are third party vendors such as Duo Web, and Authy provide REST API to enable your web applications as well. Evan Hanh List have more information on how to enable/integrate them.
- Google/Gmail: Google's two-factor authentication sends you a 6-digit code via text message when you attempt to log in from a new machine.
- Apple: Apple's two-factor authentication sends you a 4-digit code via text message or Find My iPhone notifications when you attempt to log in from a new machine.
- Facebook: Facebook's two-factor authentication, called "Login Approvals," sends you a 6-digit code via text message when you attempt to log in from a new machine.
- Twitter: Twitter's two-factor authentication sends you a 6-digit code via text message when you attempt to log in from a new machine.
- Dropbox: Dropbox's two-factor authentication sends you a 6-digit code via text message when you attempt to log in from a new machine.
- Evernote: Free Evernote users will need to use an authenticator app like Google Authenticator for Android, iOS, and BlackBerry, though premium users can also receive a code via text message to log into a new machine.
- PayPal: PayPal's two-factor authentication sends you a 6-digit code via text message when you attempt to log in from a new machine.
- Yahoo! Mail: Yahoo's two-factor authentication sends you a 6-digit code via text message when you attempt to log in from a new machine.
- Amazon Web Services: Amazon's web services, like Amazon S3 or Glacier storage, support two-factor authentication via authenticator apps, like the Google Authenticator app for Android, iOS, and BlackBerry.
- LinkedIn: LinkedIn's two-factor authentication sends you a 6-digit code via text message when you attempt to log in from a new machine.
- WordPress: WordPress supports two-factor authentication via the Google Authenticator app for Android, iOS, and BlackBerry.
There are third party vendors such as Duo Web, and Authy provide REST API to enable your web applications as well. Evan Hanh List have more information on how to enable/integrate them.
NoSQL Systems
03/02/14 21:53 Filed in: Data pipeline | NoSQL
These are so many NoSQL systems these days that it’s hard to get a quick overview of the major trade-offs involved when evaluating relational and non-relational systems in non-single server environments. There are three primary concerns must be balanced when choosing a data management.
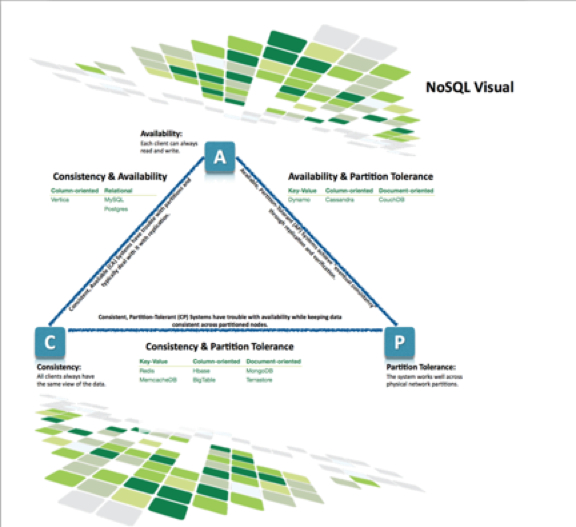
- Consistency means that each client always has the same view of the data.
- Availability means that all clients can always read and write.
- Partition tolerance means that the system works well across physical network partitions.
Cloud Characteristics
26/01/14 20:03 Filed in: Cloud architecture
The NIST Draft – Cloud Computing Synopsis and Recommendations defines Cloud characteristics as:
• On-demand self-service
• Broad network access
• Resource pooling
• Rapid elasticity
• Measured service
How do these characteristics influence run-time behavior and determine whether PaaS offerings are cloud washed or cloud native?
Measured service or pay per use
The first Cloud characteristic, measured service, enables pay-as-you-go consumption models and subscription to metered services. Resource usage is monitored, and the system generates bills based on a charging model. To close the perception gap between business end-users and IT teams, the Cloud solution should bill for business value or business metrics instead of billing for IT resources. Business end-users do not easily correlate business value with an invoice for CPU time, network I/O, or data storage bytes. In contrast, business focused IT teams communicate value and charges based on number of users, processed forms, received marketing pieces, or sales transactions. A cloud native PaaS supports monitoring, metering, and billing based on business oriented entities.
Rapid Elasticity
A stateful monolithic application server cluster connected to a relational database does not efficiently scale with rapid elastically. Dynamic discoverability and rapid provisioning can instantiate processing and message nodes across a flexible and distributed topology. Applications exposing stateless services (or where state is transparently cached and available to instances) will seamlessly expand and contract to execute on available resources. A cloud native PaaS will interoperate with cloud management components to coordinate spinning up and tearing down instances based on user, message, and business transaction load in addition to raw infrastructure load (i.e. CPU and memory utilization).
Resource Pooling
Development and operation teams are familiar with resource pooling. Platform environments commonly pool memory, code libraries, database connections, and resource bundles for use across multiple requests or application instances. But because hardware isolation has traditionally been required to enforce quality of service and security, hardware resource utilization has traditionally been extremely low (~5-15%). While virtualization is often used to increase application-machine density and raise machine utilization, virtualization efforts often result in only (~50-60%) utilization. With PaaS level multi-tenancy, deterministic performance, and application container level isolation, an organization could possible shrink it’s hardware footprint by half. Sophisticated PaaS environments allocate resources and limit usage based on policy and context. The environment may limit usage by throttling messages, time slicing resource execution, or queuing demand.
Integration and SOA run-time infrastructure delivers effective resource pools. As teams start to pool resources beyond a single Cloud environment, integration is required to merge disparate identities, entitlements, policies, and resource models. As teams start to deliver application capabilities as Cloud services, a policy aware SOA run-time infrastructure pools service instances, manages service instance lifecycle, and mediates access.
On-demand self-service
On-demand self-service requires infrastructure automation to flexibly assign workloads and decrease provisioning periods. If teams excessively customize an environment, they will increase time to market, lower resource pooling, and create a complex environment, which is difficult to manage and maintain. Users should predominantly subscribe to standard platform service offerings, and your team should minimize exceptions. Cloud governance is an important Cloud strategy component.